Caching with Aiven for Redis® and Express.js
A quick mention of Redis and its use cases, with a tutorial to using Redis to cache data when using Node.js
Chris Gwilliams
|RSS FeedSolution Architect at Aiven
Redis is a database designed for fast access to data. Blazingly fast. Although it is a database, it is not exactly like the Postgres and MySQL relational databases that you may be more familiar with. Redis is an in-memory database that stores its contents in the RAM of your Server/PC/Container/Raspberry Pi; with many persistence options such as occasionally dumping all of its data to disk or appending to a log.
Getting used to Redis to start with may be a bit of a shock when coming from a more traditional DB background but its features and potential use cases are massive and, in many ways, from zero to getting started is minutes instead of hours or days. Take a look at our Introduction to Redis for a more in-depth look at Redis and how it works under the hood.
In this post, you will have a quickstart guide for using Redis as a cache for your Node.js Express app. We will build two (beyond trivial) apps to serve a single API endpoint. Then, we will run them both, one using Redis as a cache, and the other to send data without a caching layer; to show a very simple (but convincing) benchmark of the benefits Redis can provide with an almost zero implementation cost.
The API
Because this is 2020, we have to do something so we can use the word FinTech, so we are going to provide an API that lists info about the health of Bitcoin... we will use the API of Alpha Vantage because their API is super simple, clean and free to use (with an email required for an API key). It may seem odd that I am providing free advertising to a company I know little about but it will all become clear when you hear what we will call our app....Cache in Hand — yeah, I knew you'd like it. 🐶
Step 1. Create the Express project
Express is a great framework for setting up a Node.js backend quickly but well structured and with room to scale. You will need npm installed but then you can open a command line and paste:
Loading code...
Step 2. Install your dependencies
Loading code...
Here, we use express, the Redis client, and the response-time middleware to send that information in the response headers.
Step 3. Write our server!
Let's write the app, we can do all of this in a single file and we only need 2 endpoints: one with a cache and one without.
Create a file and call it app.js, and it we will add to it now:
Imports
Loading code...
Setting up the app
Loading code...
Adding your config values
Create a file and call it config.json, inside we will create a JSON object that contains the port we will use, the API key we have and our Redis connection info.
Loading code...
Add your uncached route
Loading code...
Run It!
Now, you can run the server with node app.js and a simple curl command will show you the response text but, since we added a response time to the header, we want more info than that.
Loading code...
Using the -v flag to get a verbose output shows us the headers coming back and a response of ~435ms
Step 4. Set up Redis
You can, of course, install Redis for your OS from Redis and it is a perfectly good solution for testing or local development. However, when you want to deploy your product, you will need a more reliable and available solution. At Aiven, we provide a managed Redis service (along with $300 of credits for testing) that you can deploy on popular cloud providers, such as Google Cloud Platform, Amazon Web Services or Microsoft Azure.
All you need to do is:
- Sign up here
- Create a Project (
cache-in-handworks for this example) - Add a Redis instance, our
startupplan will be more than enough here but you can upgrade later with zero downtime - Deploy in the region of your choice and wait for us to get it running for you
- When your service is green, you will see a
Host,Portand aPassword. This is all we need for this example but different clients may need different information (You can use theService URIto connect from the CLI).
Step 5. Connect Redis and create a new route
Add the information to your config.json file and let's create a new route that adds the caching functionality to your server.
When adding to Redis, you will use a Key and a Value, for those that are used to Frontend web frameworks, this will be very similar to using a store in things like React or Vue.
The key can be extremely useful as it can be used to identify a particular client, or connection, or it can be used to identify remote content that is requested often.
In our example, we will create a Universally Unique Idetification Number or UUID when the server starts. This means that each client will see the cached information from Redis once it has been cached. We could set the key to a user's ID, for example, so only they see the cached information and other users would get newer responses.
Loading code...
Let's break it down.
- We create a unique key when the server starts
- A request comes in at
/cache-in-handand we check our Redis database for data - If it exists, then we send it along to the client
- Otherwise, we make the same request to the API as before but we also cache it in Redis before sending it to the client
That is it! Simple.
Step 6. On your (bench)marks. Get set. Go!
We could use curl to test this and read the response time header from the results but this sounds like a very manual process that could be automated, so we will!
My tool of choice is Bombardier for this kind of thing. It is built with Go but you can grab the binary if you don't want yet another language on your machine.
bombardier -c 200 -d 10s -l localhost:6666/cache-in-hand
This runs our benchmark over 10 seconds with 200 connections; the -l flag gives us more detail about the latency with a latency distribution. Let's see what happens when I run this on my machine:
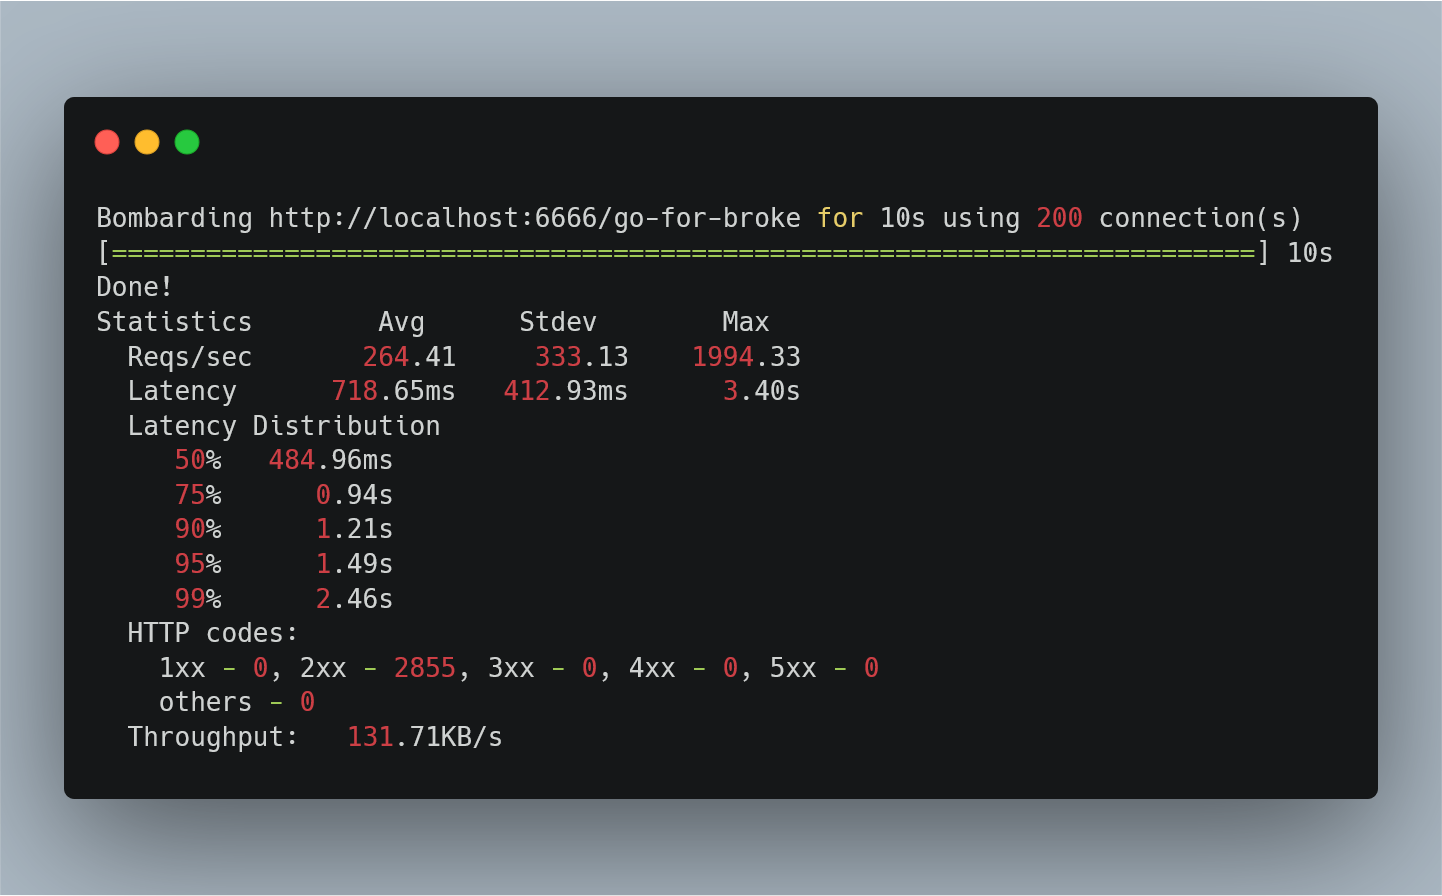
Uncached - /go-for-broke
Locally, my node server is able to handle around 300 requests per second comfortably, but still responds with 2284. For our needs, though, the latency distribution is most important. We see an average of 622ms and
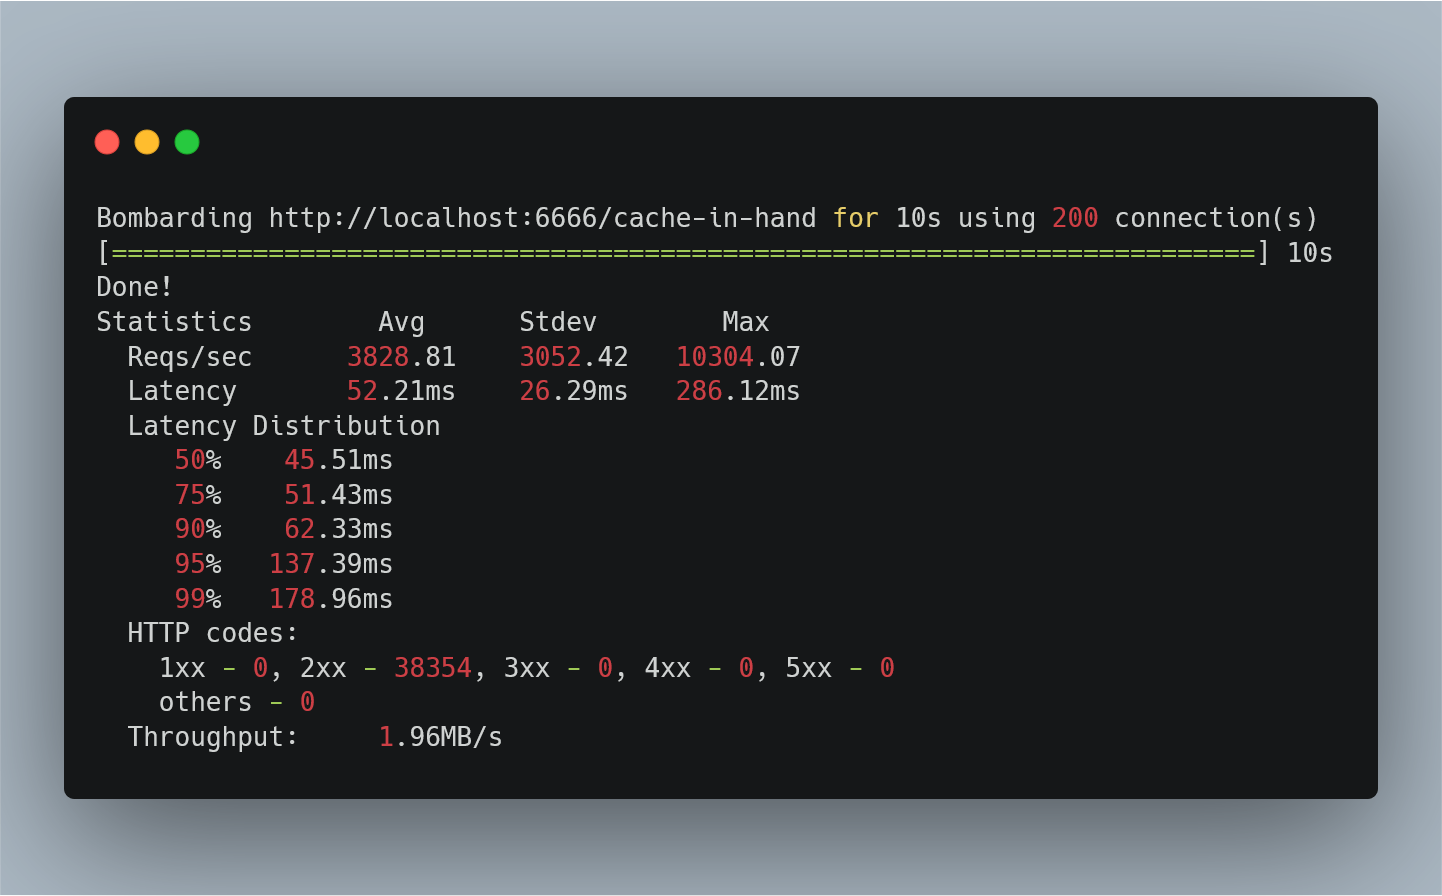
Cached - /cache-in-hand
Whoa, a pretty big difference, right? Adding Redis as a cache not only reduces the latency by a factor of ~13.8 but it also allows the fourteen times the number of requests per second.
Things to consider
- This is being run locally on your machine which (likely) has a number of other services running
- There are many configuration options we can make to Node for it to perform better
- using NODE_ENV=production (although this benefit is debatable when we are just responding with JSON)
- using a load balancer and/or a reverse proxy
- Using compression, such as
gzip(although this will also make a minimal difference in this case due to the size of the response)
Step 7. Moving forward
Wrapping this Redis check in each of your requests may be fine for a small project but, when you scale up to a few dozen routes, you will quickly want a different solution. The middleware support in Express is amazing and there are a number of caching middlewares that support Redis in npm.
The sample code can be found in our Examples Repository along with a number of other code samples for the services we offer. If you run into any issues, you can always reach out to our Support team and check out our help articles here.
Stay updated with Aiven
Subscribe for the latest news and insights on open source, Aiven offerings, and more.


