Secure your database access with HashiCorp Vault
Static credentials are a potential security risk. Learn how to setup dynamic credentials for your PostgreSQL® database with Hashicorp Vault.
Static credentials are a potential security risk. Learn how to setup dynamic credentials for your PostgreSQL® database with Hashicorp Vault.
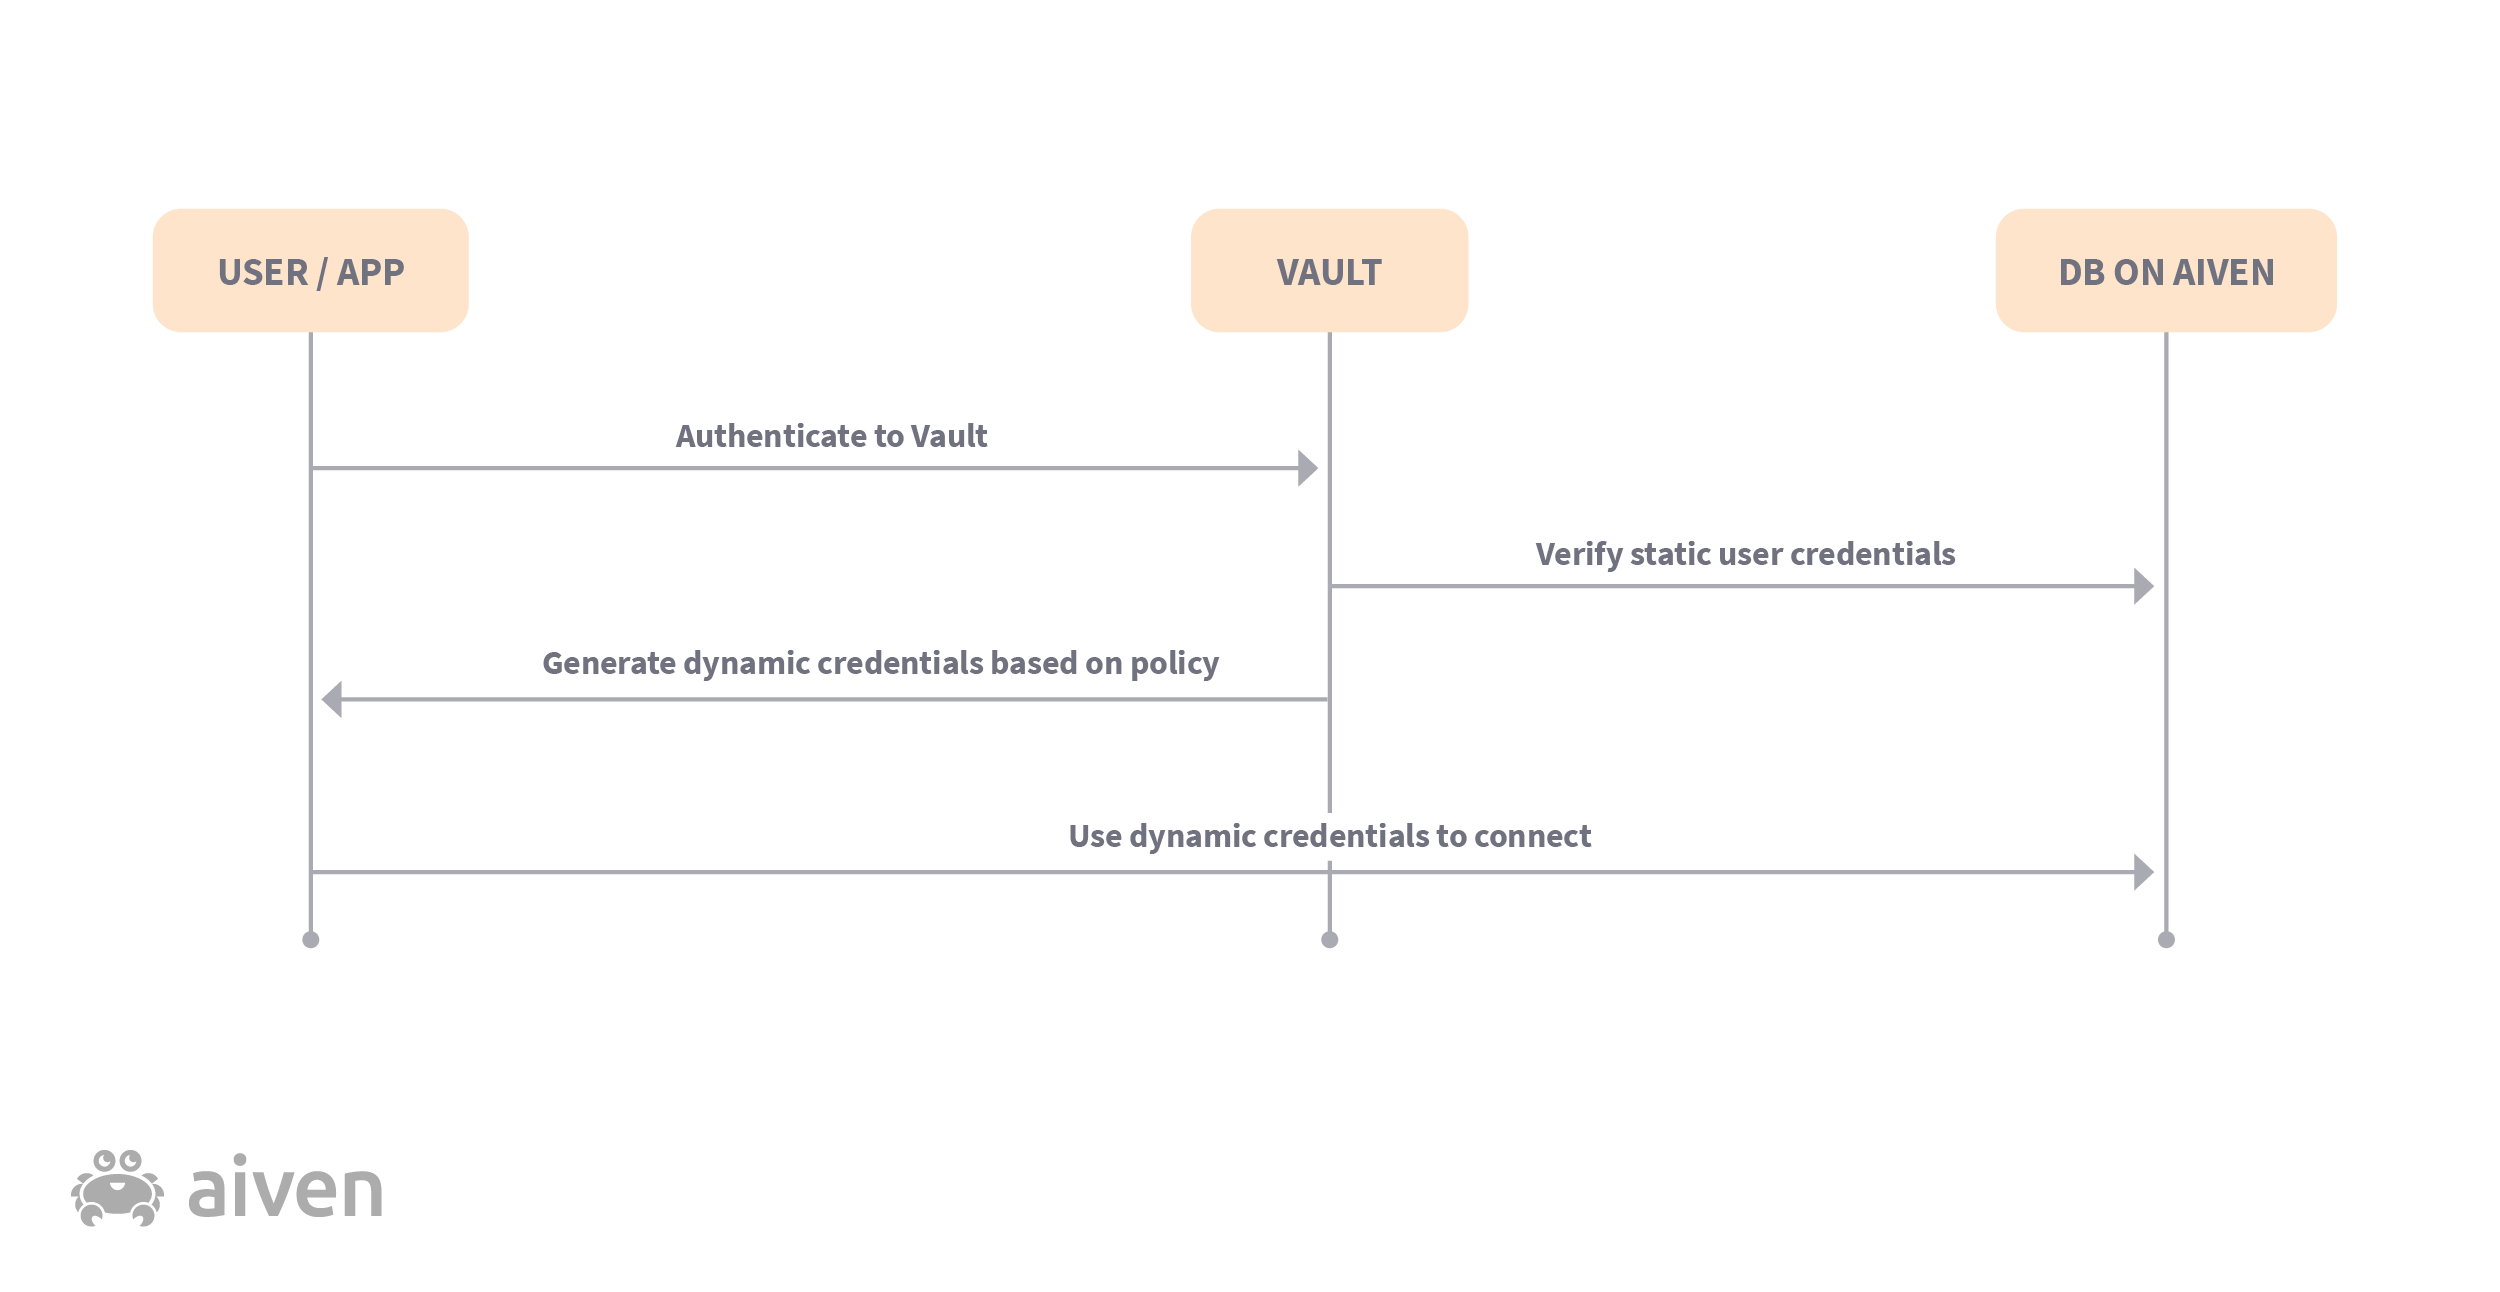
If data infrastructure is evolving to a dynamic nature, why is it still the case that you're using static database credentials inside your organization? Not only are these shared credentials used by humans, often times the same credentials are used in all of the API calls made by the applications. This poses a huge security risk as a leaked database credential in the wrong hands can cause havoc. In this blog, I introduce the concept of dynamic credentials and use HashiCorp Vault to dispense a short-lived credential to connect to a managed PostgreSQL® service.
One of the major challenges of secret sprawl is that you might not actually know how many people or CI (Continuous Integration) jobs have access to credentials. Static credentials also never expire, which makes it challenging to allow access to someone only for the time being. The final challenge of static credentials is what do you do as a break glass procedure? In case of a major breach, how do you revoke access to your data infrastructure?
A dynamic credential addresses the challenges of secret sprawl and time-bound access, as well as allowing the admin to revoke some or all of the credentials, and locking down the data infrastructure completely. The key (pun intended) here is centralization of your secrets where it's tightly access-controlled, frequently audited, and it's encrypted so that you reduce the surface area of an attack.
In today's example, you will setup credentials for an (imaginary) app that reads from/writes to the table weekly_metrics_reporting and parses some data to send project updates to stakeholders. You don't want this app to have write access to other tables, let alone contain the root database credential. In the following sections, I help you generate a short-lived credential with limited access to the database for your app.
This is the hands-on part where you setup a PostgreSQL service and a dynamic key generation/management tool called Vault. This blog post assumes that you have some knowledge of these tools. In case you need an overview, you can refer to the Aiven for PostgreSQL documentation and the HashiCorp Vault getting started guide.
If you already have a PostgreSQL instance, you can skip this part.
Otherwise, create a free trial account at Aiven and then follow the instructions to create a PostgreSQL instance.
Let's create two tables - one table has the metrics reporting and the other has the employee salaries. The app should have both read and write access to the weekly_metrics_reporting table and no access to the employee_salary table. The following blocks of SQL code will help you create these two tables using the psql terminal tool. For this exercise, you can skip ?sslmode=require when connecting to Aiven for Postgresql service using psql. When this setting is used, the server certificate is validated against the CA (certificate authority).
Loading code...
If this is an Aiven for PostgreSQL service, the values for [USER], [PASSWORD], [HOST] and [PORT] can be copied from the "Overview > Connection Information" on the Aiven Console page for that service.
If you're using a local PostgreSQL database, you can replace the [HOST] portion with localhost, [PORT] with 5432, and [USER]/[PASSWORD] with a valid database credential with admin-level access.
Create two tables - weekly_metrics_reporting and employee_salary:
Loading code...
Loading code...
Add some data to these tables:
Loading code...
Loading code...
For a production workload, you would be running Vault in a dedicated virtual machine with high availability. For this exercise, however, you'll be installing the community version of the software on your local machine. Download and install Vault and start the dev server:
Loading code...
The dev server is a built-in, pre-configured server that is not very secure but is fine to understand the concepts and try out the tool first in a non-production environment. The above command will output an Unseal Key and Root Token for the Vault server.
The trailing part of the output from one of my test run of the vault server -dev command:
Loading code...
Your output for the Unseal Key and Root Token will be different. Remember to save these values somewhere. Since this is for testing purposes, you don't need to store these values securely. After that, export the address of the Vault server:
Loading code...
Every Vault command that talks to the Vault server, uses the VAULT_ADDR environment variable. If this environment variable is not set, the user needs to pass the -address flag with every command. Once the CLI knows the address of the Vault server, it needs to know that you have the right credential to unlock the vault server. For the dev environment, the Vault server is already started in an unlocked state and the dev root token is persisted locally for use in future requests.
Vault secrets engines are components which store/generate secrets and are enabled at a "path" in Vault. By default, the secrets engine will be enabled at the name of the engine - database in this case. To enable the secrets engine at a different path, you can use the -path argument.
Loading code...
I used the following command to configure Vault with the proper plugin and connection information. I'll explain some parts of the command. vault write database writes data to Vault at the specified path. This data can be credentials, secrets, configuration, or arbitrary data. Since we have a database configuration mounted in the path, Vault expects database specific parameters, such as plugin_name, allowed_roles, etc. In my example, I'm creating a role metrics-readwrite in the defaultdb database with a valid database credential that has the appropriate permissions to perform actions upon other database users (create, update credentials, delete, etc.). Note that typically an admin will configure Vault as your developer or application should not have the privileged database credential. Once the administrator configures Vault (a less frequent task), the developer or application can use their Vault token to request less privileged and time-bound database credentials (more frequent tasks).
Note: Don't enter the actual username/password in the connection_url as Vault will give a warning if the username and password are in there directly, to ensure good security practice. The username and password fields will carry the real database credentials.
Loading code...
Although we created the metrics-readwrite role in the previous command, we didn't tell Vault what this role is allowed to do. Let's configure the role metrics-readwrite and tell Vault what actions a user/app with that role can perform on the database.
In the following command, I'm telling Vault that a user/app with metrics-readwrite role should be allowed to perform both read and write (hence the GRANT ALL) actions on the weekly_metrics_reporting table and a credential generated with such role should have a default TTL (Time To Live - the time before the credential expires) of 1 hour.
Loading code...
You can also expand the access for this role to multiple tables based on your need.
Now that we're all set, let's generate a dynamic credential for the weekly metrics reporting app. Assuming that your application developer has access (a valid Vault token) to talk to the Vault server, they can programmatically generate credentials:
Loading code...
When I ran the above command, the output was:
Loading code...
In the terminal output, we see the new credentials that the application can use. There is also the lease duration which is set to an hour, so the credentials won't work after that amount of time. This reduces the security risk that long-lived database credentials pose.
If you are using Aiven for PostgreSQL, then you can validate that a database credential was indeed created from the Aiven Console under the Services > Your PostgreSQL service > Users tab.
A more general way to test that the generated credential indeed works as expected, is by using psql:
Loading code...
When prompted for the password, use the password from the dynamic credential generated above. For the example output, I replaced the <PG-username-generated-above> with v-root-metrics--V7OeOHoN5Vca3qhd8JJk-1647544001 and used afk0P-R8YgfAlblsyRzt as the password. These values will differ when you execute the command.
Once you're in, try the following two commands:
Loading code...
The first command should output the following table:
| id | week_ending | product_downloads | github_stars | twitter_followers |
|---|---|---|---|---|
| 1 | 2022-02-25 00:00:00 | 110005 | 2300 | 17500 |
| 2 | 2022-03-04 00:00:00 | 116097 | 2600 | 20300 |
| 3 | 2022-03-11 00:00:00 | 129000 | 3300 | 22800 |
The second command should produce an error message:
Loading code...
Loading code...
When I ran this command, it created a credential with username root_aiven-dev-role_50f85d2f-2d61-41f9-8759-15f3d6798a35 but this will be different based on your Vault username, the name of the role, and a random UUID. The flag username_template suggests the pattern to follow when generating the username. You can learn more on Vault's username templating from the Vault docs.
To recap, I discussed why long-lived database credentials pose a security risk and how dynamic database credentials can help in that regard. I covered a hands-on exercise on setting up a managed PostgreSQL service on Aiven and using Vault to generate a dynamic database credential for that database.
To learn more about Aiven's managed PostgreSQL offering and HashiCorp Vault, check out:
If you're not using Aiven services yet, sign up now for your free trial at https://console.aiven.io/signup!
Table of contents
psql -h [HOST] -p [PORT] -U [USER] defaultdbcreate table weekly_metrics_reporting (
id serial PRIMARY KEY,
week_ending TIMESTAMP NOT NULL,
product_downloads INT NOT NULL CHECK (product_downloads >= 0),
github_stars INT NOT NULL CHECK (github_stars >= 0),
twitter_followers INT NOT NULL CHECK (twitter_followers >= 0)
);create table employee_salary (
emp_no INT NOT NULL PRIMARY KEY,
salary int NOT NULL,
name VARCHAR(30) NOT NULL,
hire_date DATE NOT NULL
);insert into weekly_metrics_reporting (week_ending, product_downloads, github_stars, twitter_followers) values ('2022-02-25', 110005, 2300, 17500);
insert into weekly_metrics_reporting (week_ending, product_downloads, github_stars, twitter_followers) values ('2022-03-04', 116097, 2600, 20300);
insert into weekly_metrics_reporting (week_ending, product_downloads, github_stars, twitter_followers) values ('2022-03-11', 129000, 3300, 22800);insert into employee_salary (emp_no, salary, name, hire_date) values (123, 85000, 'best avocado', '2020-01-25');
insert into employee_salary (emp_no, salary, name, hire_date) values (124, 65000, 'avg avocado', '2020-01-18');
insert into employee_salary (emp_no, salary, name, hire_date) values (127, 50000, 'ok avocado', '2020-01-29');vault server -devThe unseal key and root token are displayed below in case you want to
seal/unseal the Vault or re-authenticate.
Unseal Key: MZrvnzwGUlhj6HWjmdKUxQ3AJWP5s9dFOJS9c3H5cLk=
Root Token: s.T1C9mFSJu03gvn86CUqvRUeV
Development mode should NOT be used in production installations!export VAULT_ADDR='http://127.0.0.1:8200'vault secrets enable databasevault write database/config/aiven-for-postgresql-database \
plugin_name=postgresql-database-plugin \
allowed_roles="metrics-readwrite" \
connection_url="postgresql://{{username}}:{{password}}@[HOST]:[PORT]/defaultdb" \
username=[USER] \
password=[PASSWORD]vault write database/roles/metrics-readwrite \
db_name=aiven-for-postgresql-database \
creation_statements="CREATE ROLE \"{{name}}\" WITH LOGIN PASSWORD '{{password}}' VALID UNTIL '{{expiration}}'; \
GRANT ALL ON weekly_metrics_reporting TO \"{{name}}\";" \
default_ttl="1h" \
max_ttl="24h"vault read database/creds/metrics-readwriteKey Value
--- -----
lease_id database/creds/metrics-readwrite/nt26w4S0o17hSSnNAb9QAO5g
lease_duration 1h
lease_renewable true
password afk0P-R8YgfAlblsyRzt
username v-root-metrics--V7OeOHoN5Vca3qhd8JJk-1647544001psql -h [HOST] -p [PORT] -U <PG-username-generated-above> defaultdbselect * from weekly_metrics_reporting;
select * from employee_salary;ERROR: permission denied for table employee_salaryvault write database/config/aiven-for-postgresql-database \
plugin_name=postgresql-database-plugin \
allowed_roles="aiven-dev-role" \
connection_url="postgresql://{{username}}:{{password}}@[HOST]:[PORT]/defaultdb" \
username=[USER] \
password=[PASSWORD] \
username_template={{.DisplayName}}_{{.RoleName}}_{{uuid}}