Real-time AI Agent communication with Valkey™ and an LLM
Integrating Valkey® pub/sub with Amazon Bedrock for AI agent communication
Integrating Valkey® pub/sub with Amazon Bedrock for AI agent communication
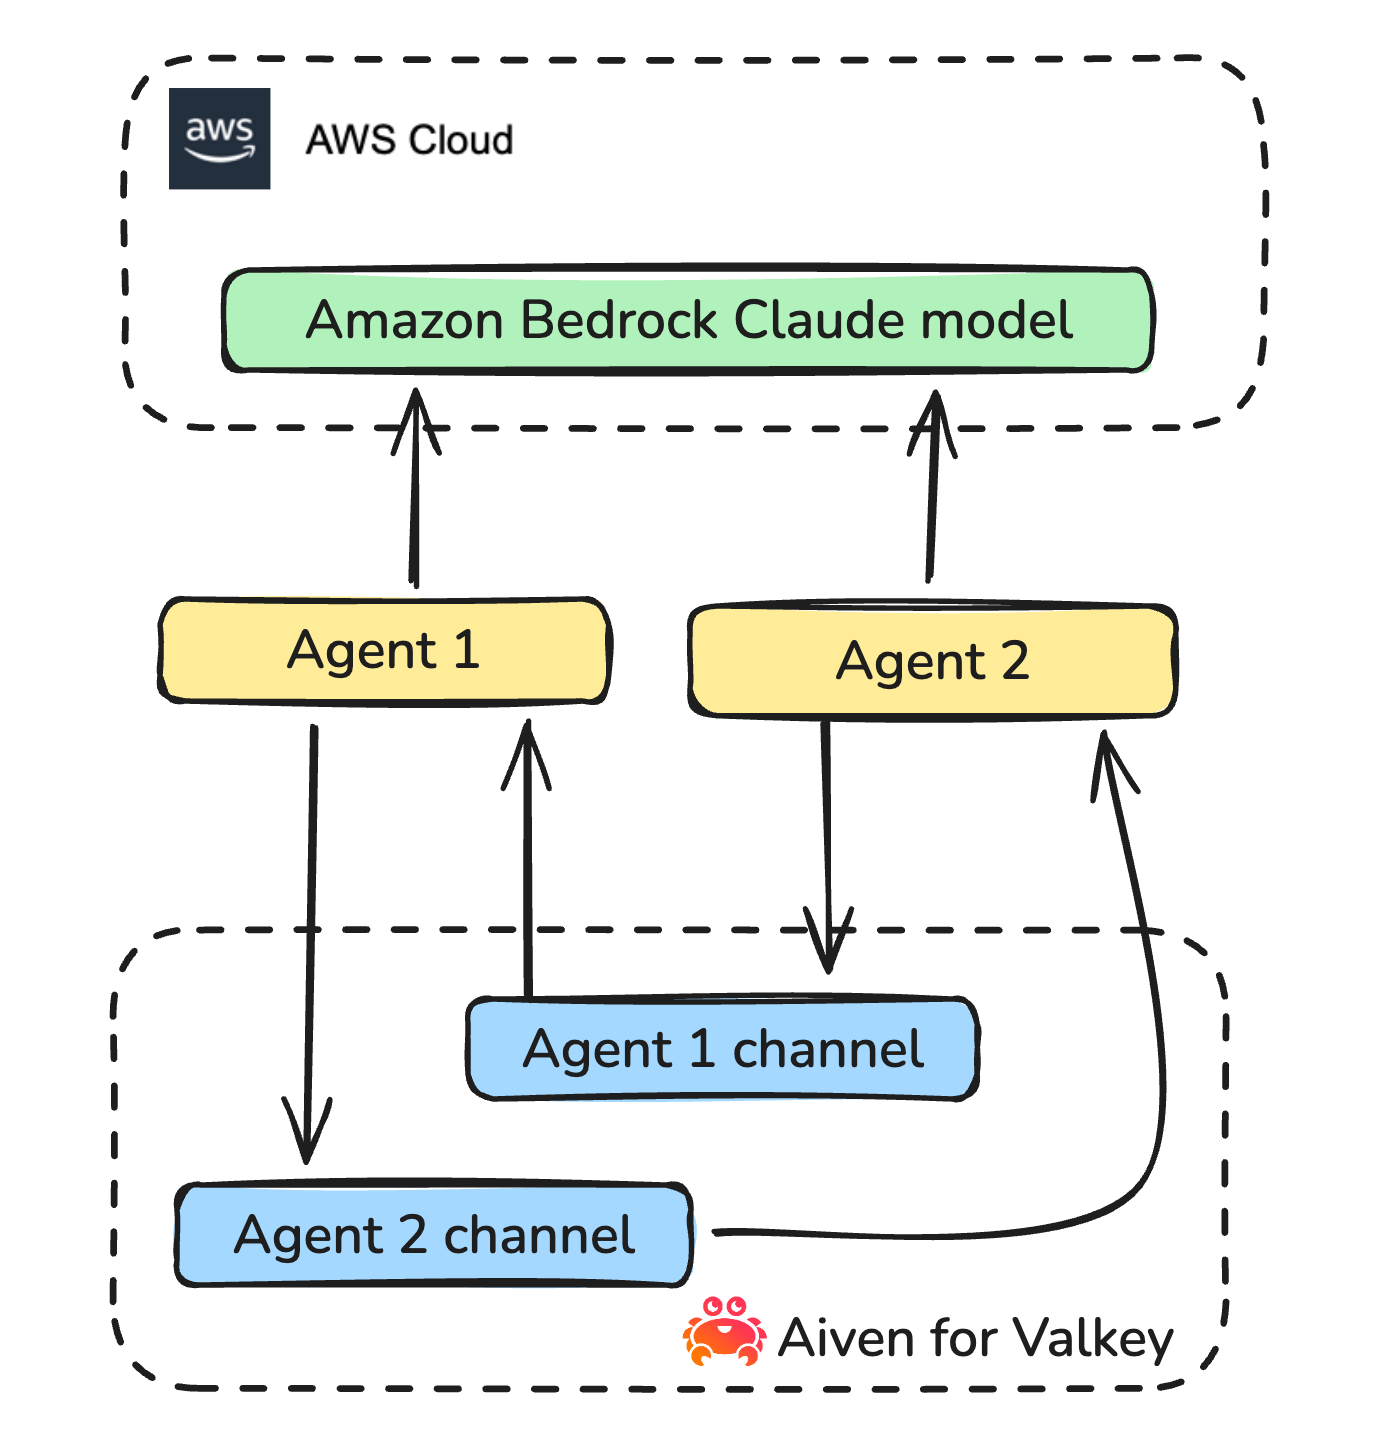
This tutorial will walk you through setting up a communication system between AI agents using Aiven for Valkey™ and Amazon Bedrock’s Claude model. The goal is to enable agents to operate independently while staying in sync through a pub/sub service.
This setup is particularly useful in scenarios like automating customer support, managing IoT devices, or any situation where systems need to communicate in real-time.
In this tutorial we'll take an example of two inhabitants of an imaginary planet that meet and start talking.
The complete code can be found in the github repository. However, by following the steps below you can create the project step by step on your own.
To follow along you'll need:
To ensure our agents can operate independently while still listening to each other, we'll need a pub/sub service. For this tutorial, we're using Aiven for Valkey.
If you don't have an Aiven account yet, register here. You can create an Aiven for Valkey service via the console, CLI, or with a Terraform script. More details can be found on the get started page.
Once your service is up and running, make sure to copy the service URI — we'll need it later.
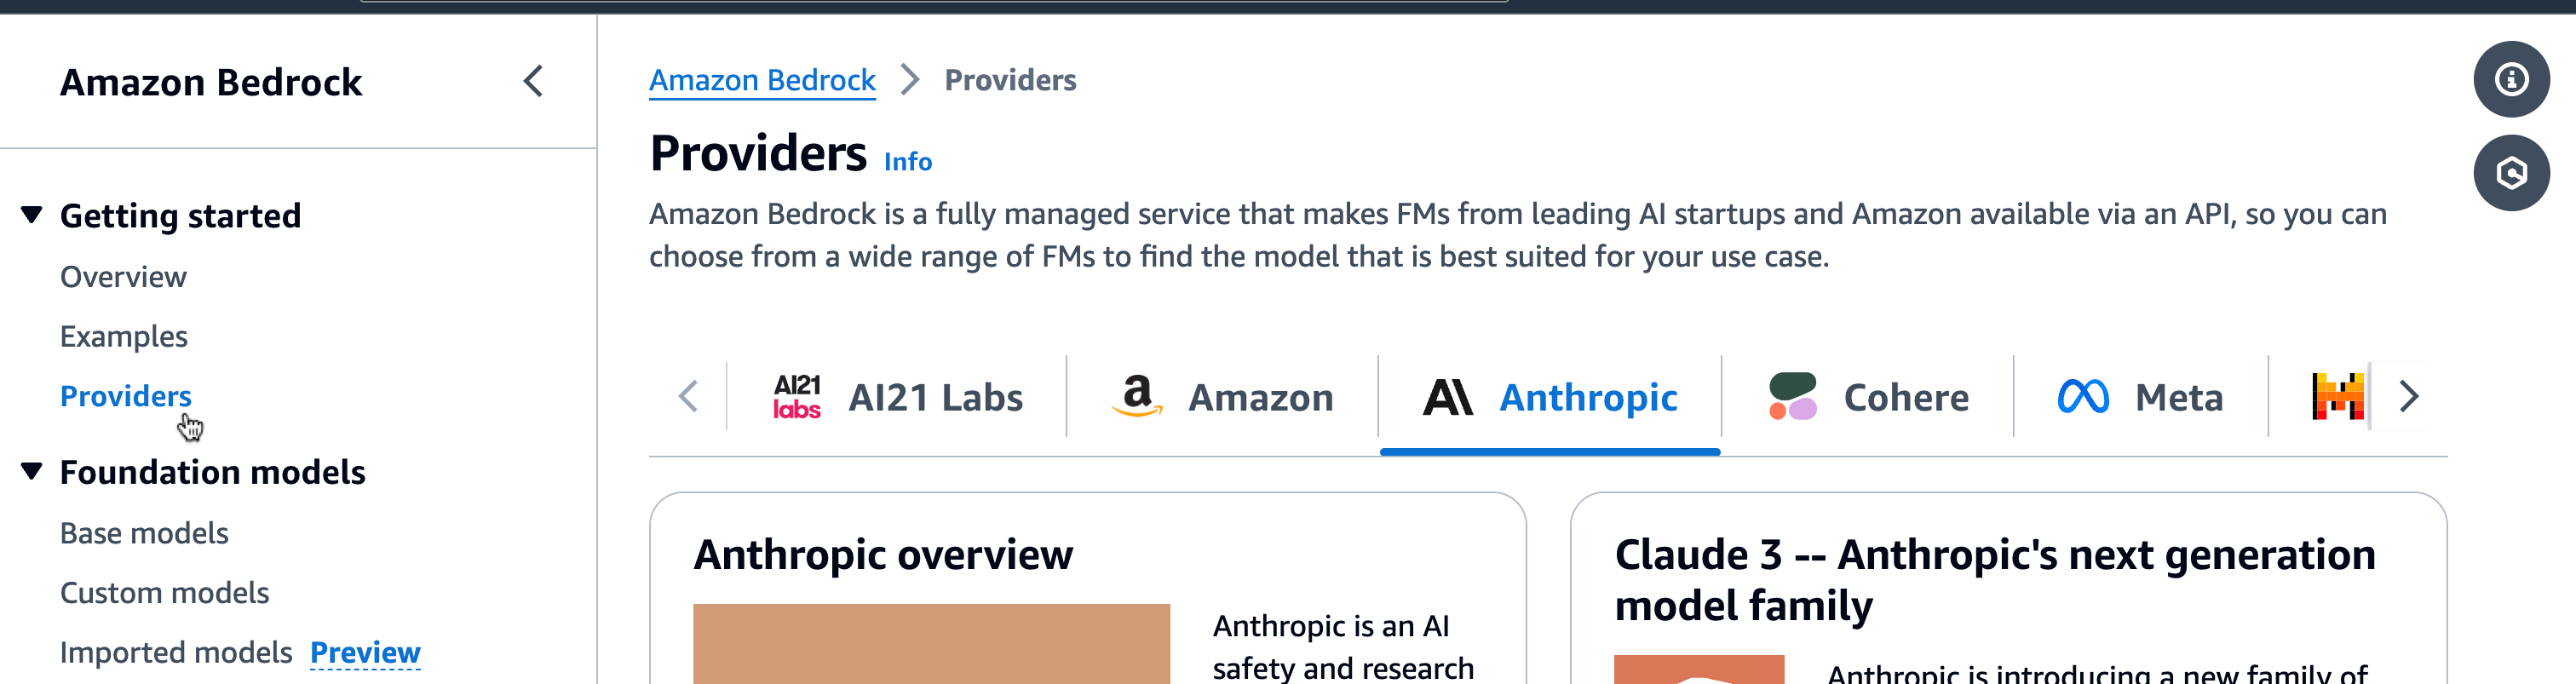
In this project, we’re using the Claude LLM available through Amazon Bedrock. Before we can invoke the model, we need to enable access:
This account does not currently have access to this model. Request access in Model access. go to Model access and enable the model.This project assumes that AWS_SECRET_ACCESS_KEY and AWS_ACCESS_KEY_ID are set as environment variables.
Follow AWS documentation for more details.
Time to write some code. We’ll be using Node.js, so start by creating a new project folder and running npm install. Feel free to keep the default answers while creating a package.json.
Next, create a file named agent.js where we’ll define an Agent class to hold the properties and methods needed for our agents. The basic properties we’ll include are:
Our agent will also need an initialization method to kickstart the conversation and listen to other agents. We’ll add this method along with a couple of placeholder methods - startListeningToOthers and startConversation - that we’ll implement in later steps.
Here’s a basic version of our Agent class:
Loading code...
Admittedly, this code is pretty bare-bones right now, but it gives us a good starting point. To get things rolling, let’s create a run.js file to initiate a conversation between a couple of agents:
Loading code...
You can run this script with:
node run
Our agents’ ability to listen and communicate will depend on a pub/sub system using Aiven for Valkey.
For this project, we’ll use the iovalkey library, a fork of ioredis, which is widely used in the industry.
To add iovalkey as a dependency, run:
Loading code...
This will update your package.json and install the library.
Now, let’s create a client and subscribe it to a channel. To keep Valkey-related functionality separate from the Agent methods, we’ll create a new file called common.js where we’ll handle communication with Valkey, as well as AWS in the steps below.
Add the following subscribe method to common.js:
Loading code...
In this subscribe method, we define a Valkey client and subscribe it to the specified channel. For convenience, we return the valkeyClient so that we can use the events it provides within the agent.
One more thing that we need to do to communicate with the Valkey service is to define VALKEY_SERVICE_URI in the process environment variables. To securely manage the service credentials and prevent accidental commits of sensitive information, we’ll use the dotenv library. Install it with
Loading code...
Add a .env file to your project (and don’t forget to add .env to your .gitignore if you’re planning to commit your code to GitHub). Populate your .env file with the Valkey service URI, which you can find on the Aiven service page you created earlier:
Loading code...
To load VALKEY_SERVICE_URI into process.env, import dotenv to common.js and run the config method:
Loading code...
Now that we have subscribe method, we can implement the startListeningToOthers method in the Agent class, where we subscribe the agent to its own channel. This method subscribes the agent to its own channel, essentially giving the agent "ears" to listen and react to messages on that channel:
Loading code...
Messages sent to the channel can be in any format we choose, but for simplicity, we’ll use JSON, with each message containing two properties: the name of the agent who sent the message, and the message body itself.
Next, we’ll implement the replyToMessage method. Here’s what this method will do:
Loading code...
We also need to add sendToChannel method to common.js. This method will create a new Valkey client that publishes a message to a channel. Keep in mind that a single client cannot both read and publish messages; it can only perform one type of operation:
Loading code...
Since we’re already working with replyToMessage, let’s go ahead and add the startConversation method, which initiates a conversation by calling replyToMessage with just the recipient’s name, without any initial message:
Loading code...
We’re almost done! The last piece we need is the functionality to interact with the Claude model.
We’ll need a couple of prompts to communicate with the model and specify what we want it to do. Below are some example prompts, but feel free to modify them to suit the story you want to create.
Add this code to a file called prompts.js:
Loading code...
To avoid an endless loop of conversation, we instruct the model to respond with "[END]" once the agent is finished talking.
We’ve separated the prompt used to start the conversation from the one used to continue it. Now, let’s add a getPrompt method to the Agent class that creates the appropriate prompt:
Loading code...
Now, let’s integrate Amazon Bedrock into our project. First, install the @aws-sdk/client-bedrock-runtime library:
Loading code...
For AWS credentials, you can either add them to your .env file or store them securely elsewhere to be picked up by the AWS SDK.
Once that’s set up, create a Bedrock client in common.js and add the invokeModel method:
Loading code...
Finally, it’s time to run the code:
Loading code...
You should see Nick and Judy exchanging messages:
In this tutorial, we set up a communication channel between two agents using Amazon Bedrock and Valkey pub/sub. Currently, our agents only have short-term memory. As a next step, consider adding long-term memory to help the agents remember each other and recall past conversations.
If you're curious to learn more things you can do with Aiven and AI look at:
Table of contents
class Agent {
    constructor(agentName, anotherAgent, starts) {
        this.agentName = agentName;
        this.anotherAgent = anotherAgent;
        this.shortMemory = [];
        this.starts = starts;
    }

    async initiate() {
        // await this.startListeningToOthers();
        if (this.starts) {
            // await this.startConversation(this.anotherAgent);
        }
    }
}

export default Agent;
import Agent from './agent.js';
const nick = new Agent('Nick', 'Judy', false);
nick.initiate();
const judy = new Agent('Judy', 'Nick', true);
judy.initiate();npm install iovalkeyimport Valkey from 'iovalkey'
export const subscribe = (channel) => {
const valkeyClient = new Valkey(process.env.VALKEY_SERVICE_URI);
valkeyClient.subscribe(channel, async (err, count) => {
if(err) {
console.error(`ERROR: failed to subscribe to channel ${channel}. error: ${err.message}`);
} else {
console.log(`NOTIFICATION: successfully subscribed to channel ${channel}`);
}
})
return valkeyClient;
}npm install dotenvVALKEY_SERVICE_URI=YOUR-AIVEN-FOR-VALKEY-SERVICE-URIimport dotenv from 'dotenv'
dotenv.config()async startListeningToOthers() {
const subscriber = subscribe(this.agentName);
subscriber.on("message", async (channel, message) => {
const parsedMessage = JSON.parse(message);
await this.replyToMessage(parsedMessage.agent, parsedMessage.message)
})
}async replyToMessage(recipient, message) {
if (message && message.includes("END")) {
return;
}
const prompt = this.getPrompt(message);
console.log(`### ${this.agentName.toUpperCase()} PROMPT: ###`)
console.log("prompt: " + this.agentName, prompt)
const response = await invokeModel(prompt);
console.log(`=== ${this.agentName.toUpperCase()} SAYS: ===`)
console.log($${response}`);
if (message) {
this.shortMemory.push($${recipient} said: ${message}`)
}
this.shortMemory.push(`You replied: ${response}`);
sendToChannel(recipient, JSON.stringify({agent: this.agentName, message: response}));
}export const sendToChannel = (channel, message) => {
const valkeyClient = new Valkey(process.env.VALKEY_SERVICE_URI);
valkeyClient.publish(channel, message);
}async startConversation(recipient) {
await this.replyToMessage(recipient);
}export const getPromptStart = (agentName) => `You're an inhabitant of a planet Hipola, a very small and cosy planet. Your name is ${agentName}.`;
export const instructions = `Always follow these instructions:
- If you just met, introduce yourself and learn their name;
- if it's ongoing conversation, don't say hello again and don't introduce yourself again, just continue the conversation, reply or ask question, be natural;
- answer the questions of the other inhabitant;
- be consise, a couple of sentences is enough
- if you want to finish the conversation and when both of you said goodbye to each other, respond "[END]"
`;
export const getStartConversationPrompt = (agentName) => $${getPromptStart(agentName)}. Start the conversation. ${instructions}`;
export const getContinueConversationPrompt = (agentName, memoryString, message) => {
const shortMemory = !!memoryString ? `This is the conversation so far: ${memoryString}` : '';
return ` ${getPromptStart(agentName)}
You're meeting another inhabitant. ${shortMemory}
Reply to this message from another inhabitant from the planet Hipola: "${message}". If you already had several messages exchanged, politely say goodbye and end conversation. Be concise. Remember, you're ${agentName}.
${instructions}`};
getPrompt(message) {
    return !!message ? getContinueConversationPrompt(this.agentName, this.shortMemory.join('\n - '), message) : getStartConversationPrompt(this.agentName);
}
npm install @aws-sdk/client-bedrock-runtime
import {BedrockRuntimeClient, InvokeModelCommand} from "@aws-sdk/client-bedrock-runtime";

const bedrockClient = new BedrockRuntimeClient({
    region: 'us-east-1',
    credentials: {
        secretAccessKey: process.env.AWS_SECRET_ACCESS_KEY,
        accessKeyId: process.env.AWS_ACCESS_KEY_ID
    }
})

export const invokeModel = async (prompt) => {
    const command = new InvokeModelCommand({
        "modelId": "anthropic.claude-3-haiku-20240307-v1:0",
        "contentType": "application/json",
        "accept": "application/json",
        "body": JSON.stringify({
            "anthropic_version": "bedrock-2023-05-31",
            "max_tokens": 1000,
            "messages": [
                {
                    "role": "user",
                    "content": [
                        {
                            "type": "text",
                            "text": prompt
                        }
                    ]
                }
            ]
        })
    })
    const response = await bedrockClient.send(command);
    const decodedResponseBody = JSON.parse(new TextDecoder().decode(response.body));
    return decodedResponseBody.content[0].text;
}
node run