Import your existing data platform using Terraform
Scaling up? Learn how to retroactively manage your data platforms with Terraform
All deployment needs are not the same. At times, you need to create one service for a proof-of-concept project. Oftentimes, you need to create large scale deployments on a regular basis.
Most engineering teams create infrastructure resources using the GUI, CLI, and other automation tools. This creates an unmanageable state of running resources without any one tool to control.
In this tutorial, we'll talk about the power of the terraform import command to import existing infrastructure into Terraform as a starting point for version-controlled management. This allows you to continue managing the imported resources through Terraform.
The pain of imperative commands
It’s hard to find an organization without complex shell scripts that have been passed on to them over the years. While you cannot version-control clicks of a button, you can version-control scripts. However, when you deploy resources using these scripts or create resources from the click of a button, you don’t have a way to store the state of your infrastructure resources. This is the imperative way of creating resources.
Tools like Terraform and Kubernetes use a declarative approach where you declare what the state of your infrastructure will be. The tool will execute underlying API commands to ensure that desired state.
terraform import: an overview
The terraform import command is useful in cases where you already have infrastructure in place that you'd like to manage through Terraform, or if you're transitioning from manual provisioning to using Terraform.
By importing existing resources into Terraform, you can start version-controlling your infrastructure and take advantage of Terraform's features for defining, versioning, and planning changes to your infrastructure.
For example, you might have started with a single instance of PostgreSQL as your primary database and a couple of Redis services for caching and session store needs. These services were created by clicking a button on the console or running a one-off script. As your business grows, not only will you need to add more instances, but you will also need to deploy services to multiple cloud regions for high availability. This is where you can take advantage of Terraform to create new services programmatically as well as import the previously created services using the terraform import command.
terraform [global options] import [options] ADDR ID
The command expects two input parameters - ADDR and ID. You can think of ADDR as a placeholder for Terraform to import the existing resource into. The ID is the identifier value of the specified resource that is not currently under Terraform management.
The setup
Imagine you’re a DevOps Engineer who is tasked to bring all infrastructure resources under Terraform management. Before importing your existing resources into Terraform, your setup might look something like this:
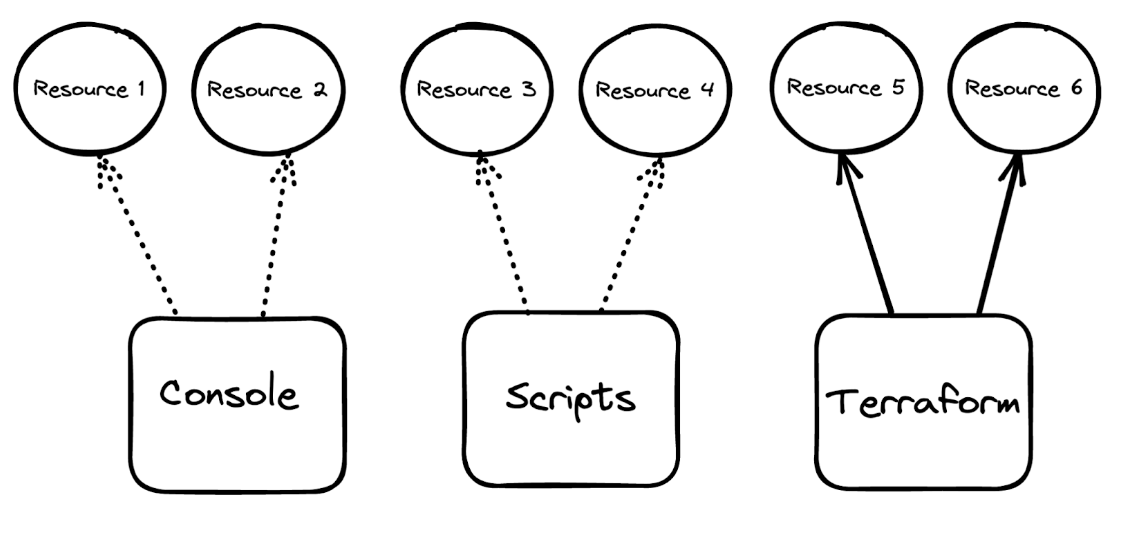
The dotted lines indicate that these resources are created in an imperative way and there’s often no retry logic to ensure that the remote state of the resources match your expectation. The solid lines indicate that these resources are created using Terraform in a declarative manner.
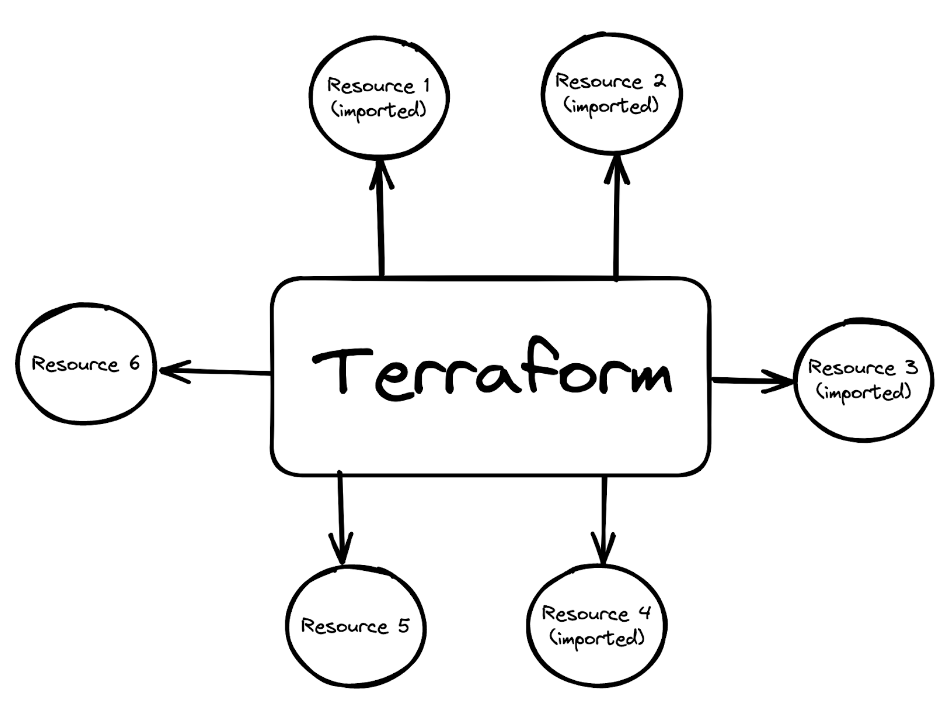
After you import the resources under Terraform management, you will be able to track the state of these resources using Terraform, version-control the declarative commands to build and rebuild your infrastructure, and do a whole lot more with all the powerful features that Terraform has to offer.
Let’s help you achieve that goal.
Prerequisites
We’ll use the Aiven console to create an Aiven for Apache Kafka® service, a Kafka topic, and a Kafka user. Then we’ll use Aiven Terraform Provider to import these resources under the Terraform management.
If you don’t have an account already, sign up for an Aiven account. While you’re at it, create an Aiven authentication token. You’ll need it soon.
Besides an Aiven API token, you will need to know the Aiven project name. You don’t need to create a new project and can use the default project for this exercise. From the Aiven console, you can find the project name from the top-left corner of your screen.
You’ll also need the Terraform CLI to follow along.
Optionally, please install jq if you don’t have it on your machine already. This will help you slice, filter, and output json data.
The technical steps
From the Aiven console, click “Create service” and then select Apache Kafka. Select your preferred cloud, region, plan, and provide a service name to create your Kafka service.
Once the service is running, go to the “Users” tab and provide a username to create a new service user. Next, from the “Topics” tab, click “Add topic”, provide the name of a topic to create a topic.
Although we created these resources using Aiven console, you could create those using the Aiven CLI as well.
Now the fun begins to import these three resources into Terraform.
Under an empty directory, create three files: provider.tf, service.tf, and variables.tf.
The provider.tf file declares the necessary dependency on Aiven Terraform Provider, adds a version number to pull for, and indicates any variable that needs to be passed during runtime.
#provider.tf
terraform {
  required_providers {
    aiven = {
      source  = "aiven/aiven"
      version = "~> 4.1.0"
    }
  }
}

provider "aiven" {
  api_token = var.aiven_api_token
}
The service.tf file contains the Terraform resources definitions. For now, this file contains the skeleton of the "aiven_kafka" resource. We’ll populate this file after we start importing the resources.
# Kafka service

resource "aiven_kafka" "imported-kafka-service" {

}
Finally, the variables.tf file indicates two variable names that the provider needs: aiven_api_token and project_name.
variable "aiven_api_token" {
  description = "Aiven console API token"
  type        = string
}

variable "project_name" {
  description = "Aiven console project name"
  type        = string
}
Now, initialize the project by running terraform init from a terminal. This will download the provider plugin and necessary dependencies.
Aiven Terraform Provider needs two inputs to execute the plan. You can either pass these values in a .tfvars file or export these as environment variables. Let’s go with exporting these values as environment variables.
Run the following in a terminal:
export TF_VAR_aiven_api_token=YOUR_API_TOKEN_GOES_HERE

export TF_VAR_project_name=YOUR_AIVEN_PROJECT_NAME_GOES_HERE
We’ll start by importing the Kafka service first, since the other two resources depend on this resource. Following the terraform import command options, for the ADDR field, we have to pass the resource specification that includes a resource type and name. For the ID field, we have to specify the Aiven resource-specific ID to identify that resource being imported.
Execute the following command to import the Kafka resource. Your Aiven service name is what you named your Kafka service when creating it.
terraform import aiven_kafka.imported-kafka-service AIVEN_PROJECT_NAME/AIVEN_SERVICE_NAME
For example,
terraform import aiven_kafka.imported-kafka-service devrel-dewan/dewan-kafka-demo
Here, aiven_kafka.imported-kafka-service is coming from the services.tf file, i.e. the placeholder for the imported resource to go in. For the ID field, devrel-dewan indicates the Aiven project name and dewan-kafka-demo is a specific resource under that project. Together, devrel-dewan/dewan-kafka-demo uniquely identifies a resource on the Aiven platform. Please change these two values based on your project and service names.
Results of a successful terraform import command:
aiven_kafka.imported-kafka-service: Importing from ID "devrel-dewan/dewan-kafka-demo"...
aiven_kafka.imported-kafka-service: Import prepared!
  Prepared aiven_kafka for import
aiven_kafka.imported-kafka-service: Refreshing state... [id=devrel-dewan/dewan-kafka-demo]

Import successful!

The resources that were imported are shown above. These resources are now in your Terraform state and will henceforth be managed by Terraform.
You’ll also notice that a terraform.tfstate file magically appeared in your directory. This state file has all the information on the Kafka service you just imported. If you look at the services.tf file, nothing should have changed. terraform import doesn’t automatically populate your Terraform resource definitions. Importing a resource does not modify the resource itself, but only updates the Terraform state to reflect its current state. To make changes to the resource, you'll need to write a Terraform configuration that specifies the desired state, and then apply it with the terraform apply command.
Let’s add the important details to the services.tf file from the terraform.tfstate file.
We are looking to find the values of four key variables: service_name, project, plan, and cloud_name. You can either go through the terraform.tfstate for these values or parse the values directly like this:
cat terraform.tfstate| jq '.resources[0].instances[0].attributes.service_name'
cat terraform.tfstate| jq '.resources[0].instances[0].attributes.project'
cat terraform.tfstate| jq '.resources[0].instances[0].attributes.plan'
cat terraform.tfstate| jq '.resources[0].instances[0].attributes.cloud_name'
Now, populate the services.tf file with these values.
# Kafka service
resource "aiven_kafka" "imported-kafka-service" {
    service_name = AIVEN_SERVICE_NAME
    project = AIVEN_PROJECT_NAME
    plan = "startup-2"
    cloud_name = "google-northamerica-northeast1"
}
For example,
# Kafka service
resource "aiven_kafka" "imported-kafka-service" {
    service_name = “dewan-kafka-demo”
    project = “devrel-dewan”
    plan = "startup-2"
    cloud_name = "google-northamerica-northeast1"
}
Now, run terraform plan.
If all goes well, you should see:
No changes. Your infrastructure matches the configuration.
What if you see that Terraform is planning to do some changes based on the terraform plan? That would mean that you need to align your resource block even more. Identify the parameter on which Terraform is showing the difference. Then update the service.tf file based on the values of the terraform.tfstate file.
As of now, we have partially imported our services. Let’s import Kafka user and Kafka topic in a similar way.
Add the following block to services.tf file:
#Kafka topic

resource "aiven_kafka_topic" "imported-kafka-topic" {

}

# Kafka user

resource "aiven_kafka_user" "imported-kafka-user" {

}
Run:
terraform import aiven_kafka_user.imported-kafka-user AIVEN_PROJECT_NAME/AIVEN_SERVICE_NAME/KAFKA_USERNAME

terraform import aiven_kafka_topic.imported-kafka-topic AIVEN_PROJECT_NAME/AIVEN_SERVICE_NAME/KAFKA_TOPIC_NAME
For example,
terraform import aiven_kafka_user.imported-kafka-user devrel-dewan/dewan-kafka-demo/dewan

terraform import aiven_kafka_topic.imported-kafka-topic devrel-dewan/dewan-kafka-demo/demo-topic
Populate the empty kafka user and kafka topic resources with the necessary details from terraform.tfstate:
# Kafka topic

resource "aiven_kafka_topic" "imported-kafka-topic" {
  project      = AIVEN_PROJECT_NAME
  service_name = AIVEN_SERVICE_NAME
  topic_name   = KAFKA_TOPIC_NAME
  partitions   = 1
  replication  = 2
}

# Kafka user

resource "aiven_kafka_user" "imported-kafka-user" {
  service_name = AIVEN_SERVICE_NAME
  project      = AIVEN_PROJECT_NAME
  username     = KAFKA_USERNAME
  password     = PASSWORD_FOR_KAFKA_USERNAME
}
For example,
# Kafka topic

resource "aiven_kafka_topic" "imported-kafka-topic" {
  project      = "devrel-dewan"
  service_name = "dewan-kafka-demo"
  topic_name   = "demo-topic"
  partitions   = 1
  replication  = 2
}

# Kafka user

resource "aiven_kafka_user" "imported-kafka-user" {
    project      = "devrel-dewan"
    service_name = "dewan-kafka-demo"
    username     = "dewan"
    password     = "AVNS_4HLcO5pYfP-fZYep1bI"
}
A note that the specific configuration like username, password, topic partitions and replication will be different for your case. The values above are shown as examples only and the credentials are not valid ones.
Now that you have updated the services.tf file according to the terraform.tfstate file, run terraform plan followed by terraform apply.
You should see the following in your console:
dewan.ahmed@Dewans-MacBook-Pro temp % terraform apply
aiven_kafka_user.imported-kafka-user: Refreshing state... [id=devrel-dewan/dewan-kafka-demo/dewan]
aiven_kafka_topic.imported-kafka-topic: Refreshing state... [id=devrel-dewan/dewan-kafka-demo/demo-topic]
aiven_kafka.imported-kafka-service: Refreshing state... [id=devrel-dewan/dewan-kafka-demo]

No changes. Your infrastructure matches the configuration.

Terraform has compared your real infrastructure against your configuration and found no differences, so
no changes are needed.

Apply complete! Resources: 0 added, 0 changed, 0 destroyed.
Congratulations! You have successfully imported resources that were created outside of Terraform under Terraform management.
The limitations
There are certain cases where you don’t want to import resources to Terraform. If you create a service that is for testing purposes and will be short-lived, the console will be a faster route to do that.
If you’re planning to import multiple resources together, it is not supported. The terraform import command can only import one resource at a time. It cannot simultaneously import an entire collection of resources, like an Aiven for Apache Kafka with a topic resource and a Kafka user resource.
Wrap up
The terraform import command is a powerful tool for quickly bringing existing infrastructure under Terraform management. By automating the process of generating Terraform configuration for existing resources, it can save you a significant amount of time and effort, and ensure that your Terraform configuration accurately reflects the state of your infrastructure. If you're already using Terraform, I highly recommend giving Terraform import a try.
Terraform is a powerful tool used by many of Aiven’s biggest customers to manage their infrastructure declaratively and in a centralized manner. As such, we’ve created the Aiven Terraform provider and the Aiven Terraform Cookbook to help you with common configuration concerns.
We also recommend trying the Aiven Operator for Kubernetes® for those looking to manage Aiven as a part of a Kubernetes deployment.