Building a Smart Documentation Search with Aiven for AlloyDB Omni and Gemini
Learn how to work with embeddings, vector search, and RAG using AlloyDB Omni, Gemini and Node.js
Learn how to work with embeddings, vector search, and RAG using AlloyDB Omni, Gemini and Node.js
To get started, you'll need:
Here’s the high-level plan:
We’ll walk through the entire process step by step. If you prefer to skip ahead or reference the final implementation, you can find the complete code in this GitHub repository.
Ready to build a better search experience? Let’s dive in!
Before vectorizing the documentation content, it's important to ensure proper chunking. Each embedding model has a limit on the size of the chunk it can process, and the quality of those chunks directly impacts the accuracy of vector search results. The goal is to create semantically coherent chunks - each one should represent a complete thought or section.
You can use your own documentation or experiment with the provided example documentation for an imaginary product - a helpful house-task robot. Download a JSON file with pre-prepared chunks here.
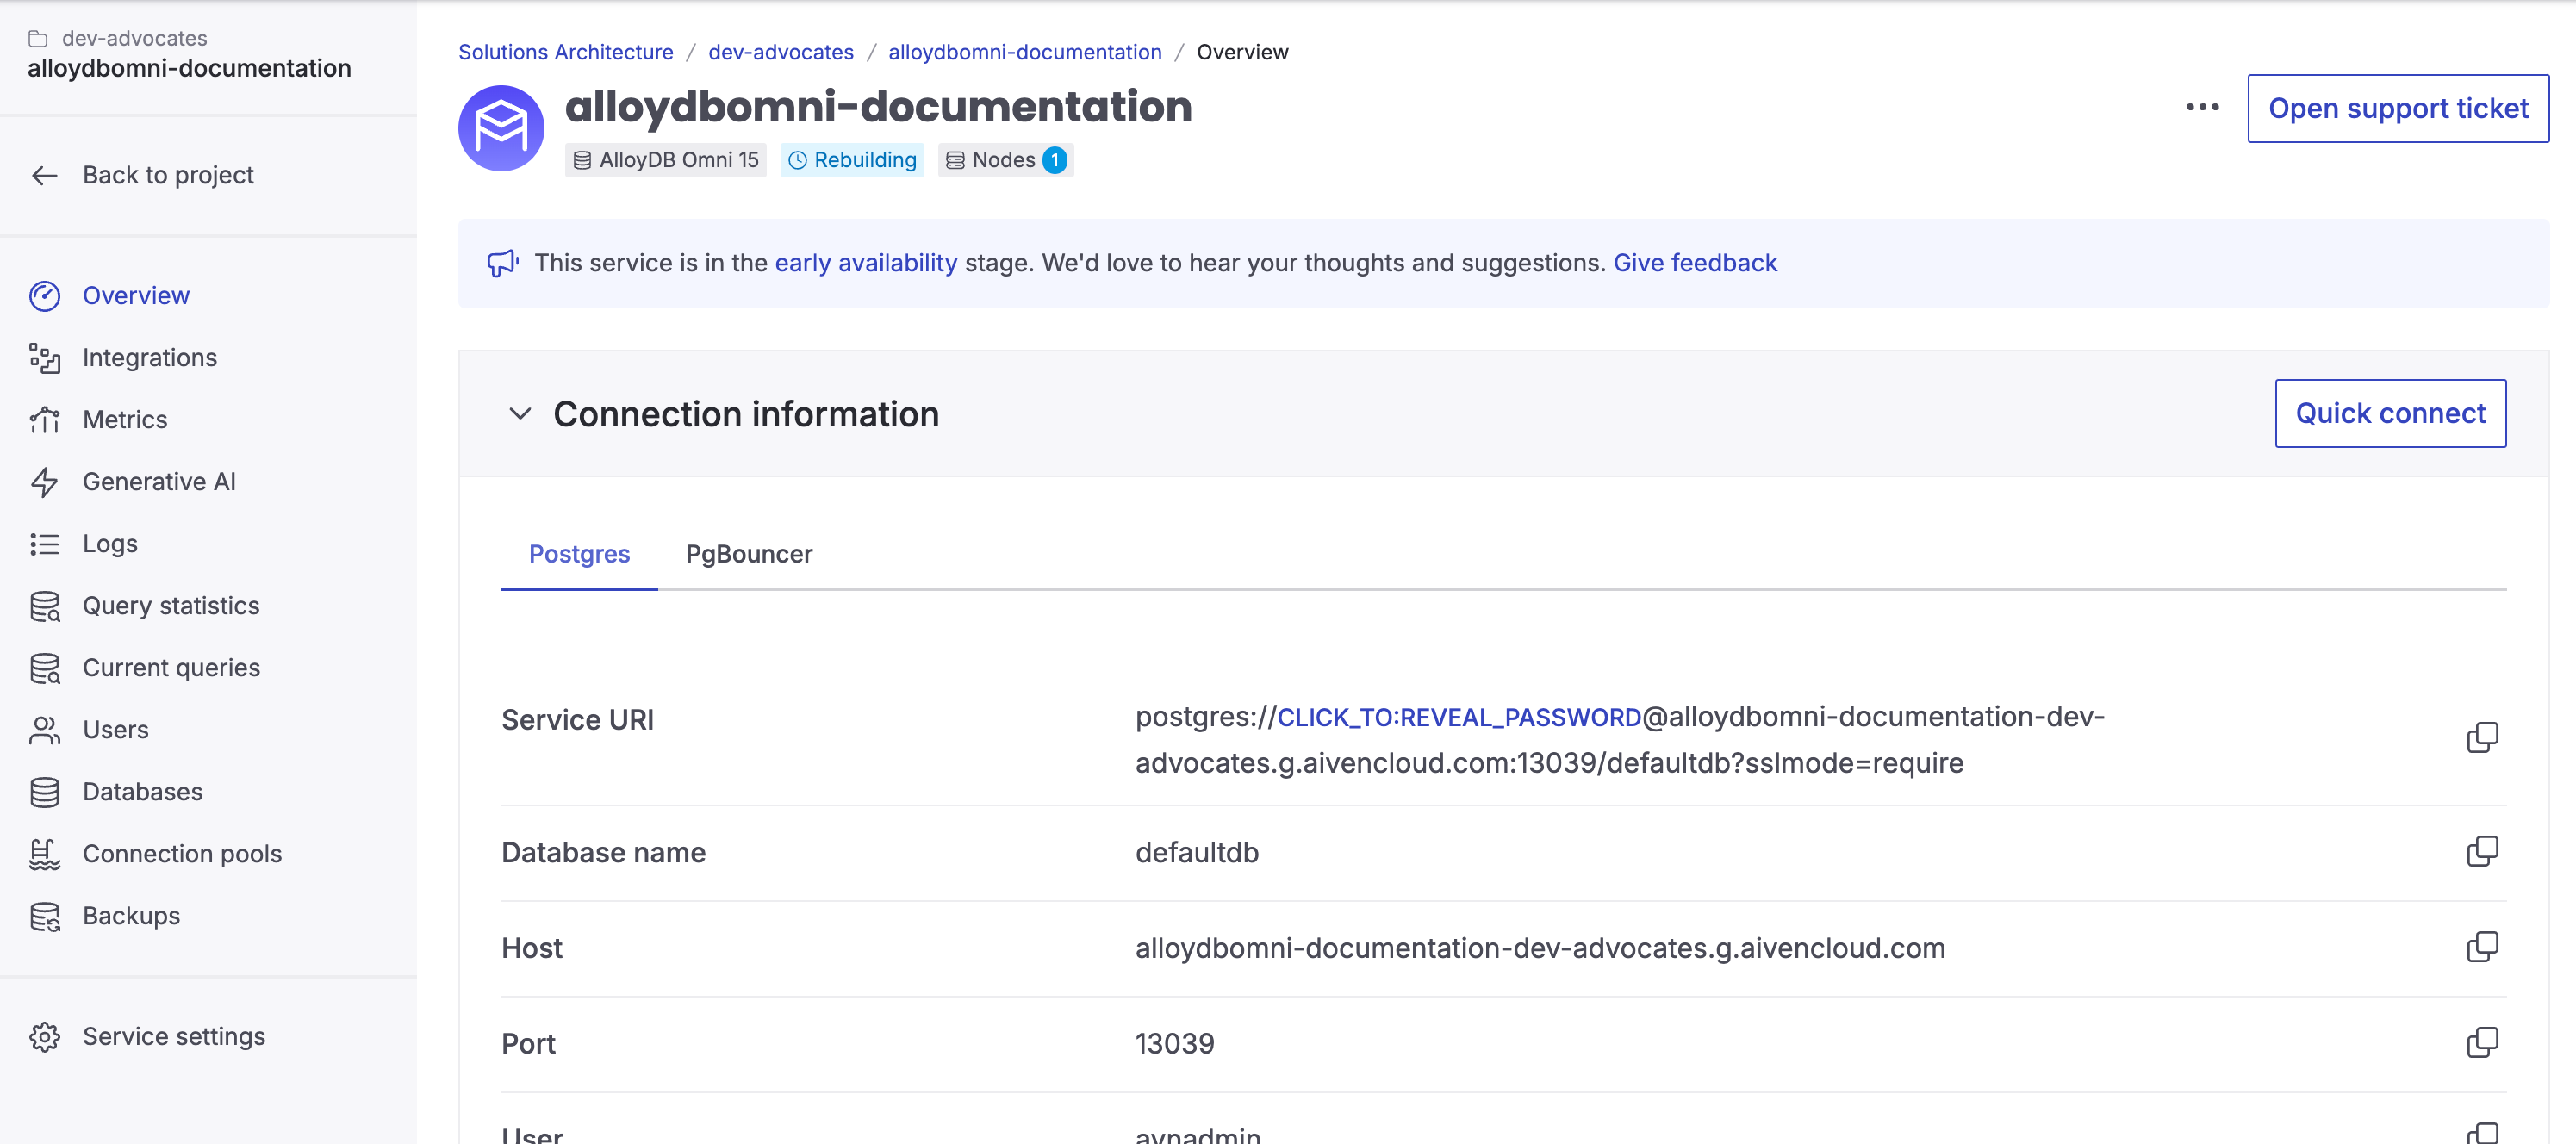
Begin by creating an Aiven for AlloyDB Omni service using Aiven’s console. Select your preferred cloud provider and region. Once the service is created, you’ll be directed to a page with connection details. Keep these details handy—we’ll need them in the next step.
We’ll use JavaScript to interact programmatically with Aiven for AlloyDB Omni and Gemini APIs. To get started, create an empty folder for this project. Alternatively, you can clone this GitHub repository, which includes all the necessary code.
If Node.js isn’t already installed on your machine, download it from the official website.
Next, create a .env file in the project directory with the following properties:
Loading code...
Fill in the AlloyDB connection properties using the connection details from your Aiven for AlloyDB Omni service landing page. After that, add your API key to enable access to the Gemini API.
Now, let’s install the required dependencies:
Loading code...
After deploying your Aiven for AlloyDB Omni service, the next step is to connect to it using Node.js. Before we proceed, we need to enable the Vector extension.
To streamline the process of managing the connection, let’s create a separate file called config.js to handle the connection setup for AlloyDB:
Loading code...
Download ca.pem file from your Aiven for AlloyDB Omni service landing page and put it next to config.js.
Now, we can use alloyDBClient whenever we need to connect to the Aiven for AlloyDB Omni instance.
To enable the Vector extension, create a new file named enable-vector-extension.js and add the following code:
Loading code...
Run this file from the command line with:
Loading code...
This code activates the Vector extension, enabling the use of an additional property type for storing embeddings.
We’ll store the documentation chunks in a table within AlloyDB Omni. To do this, we need to create a table. Let’s name it features, as it represents the product features described in the documentation.
Create a new file called create-features-table.js and add the following content:
Loading code...
Run the script using the following command: node create-features-table.js.
Now that we have an empty table, it’s time to fill it with documentation chunks. Depending on the size of your documentation, the number of items to be stored might be quite large. Instead of inserting items one by one, it’s more efficient to send them in a single multi-row request. For this, we’ll use pg-promise.
First, initialize pg-promise with its client in the configuration file and export the necessary values:
Loading code...
To generate vectors from text content, we’ll use the Gemini embedding model. To set up the Gemini API and start using its embedding capabilities, add the following lines to config.js:
Loading code...
With this setup complete, we can move on to the next step: adding a new file named store-knowledge.js, which will handle the transformation and storage logic.
Loading code...
In this file, using pg-promise, we define two columns: description and embedding. We then iterate over each documentation chunk, transform it into a vector using Google’s Gemini embedding model, and add it to the list of rows. Finally, we use pgpClient to send a query that inserts the collected rows into the table.
To execute the code from the command line, run:
Loading code...
If everything ran without errors, the records should have been successfully processed and stored in the table.
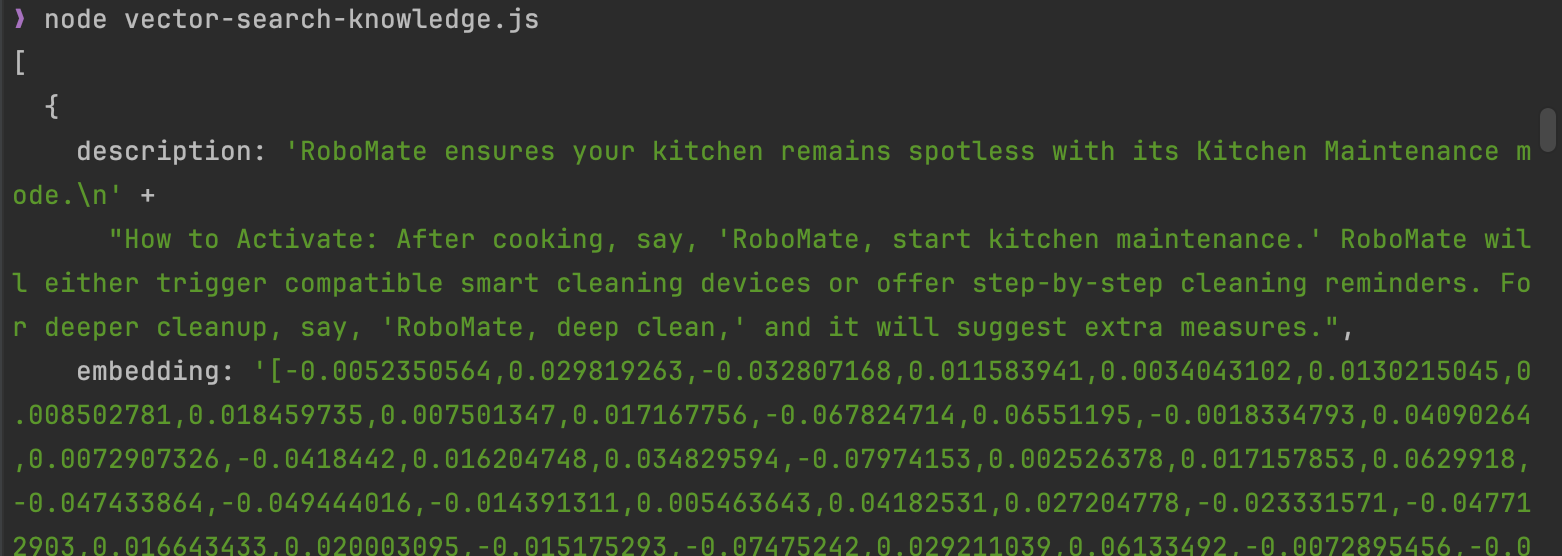
Now, let’s test the vector search. To find the two nearest vectors, we’ll use an SQL query that looks like this:
Loading code...
Translating this into JavaScript:
Loading code...
The function will output two semantically nearest articles to the search phrase:
With vectorized content ready, we can enhance it further by using the power of a large language model (LLM) to ask questions about the documentation. This technique, known as retrieval-augmented generation (RAG), combines vector search with an LLM request to provide more contextually accurate answers.
The process can be broken into three steps:
Here’s how this looks in the code:
Loading code...
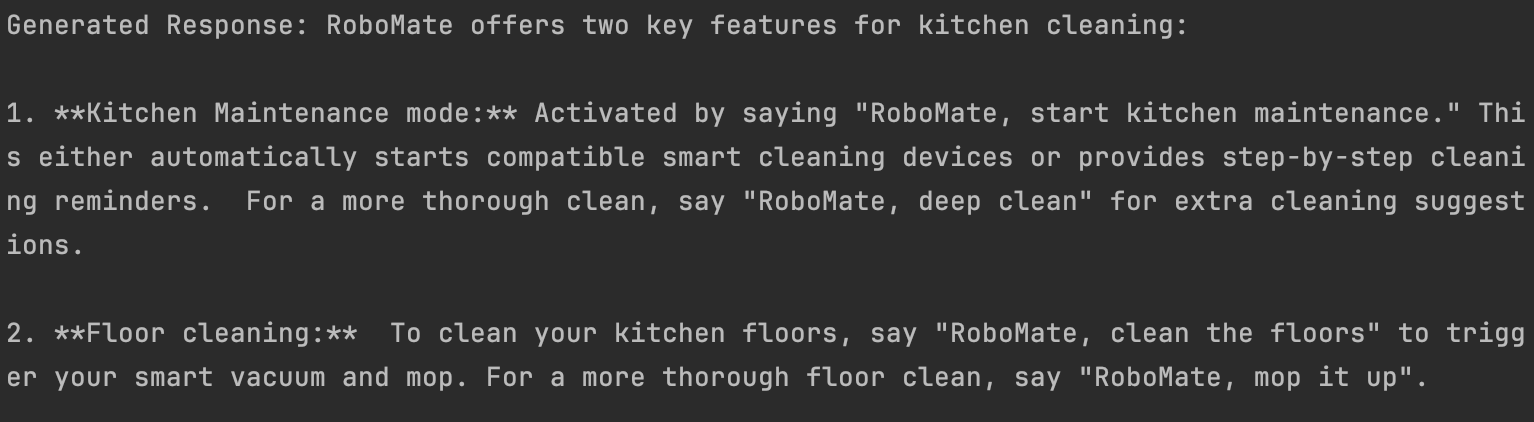
Running this code you'll see two outputs. First, using the vector search results a prompt phrase is built:
Secondly, the prompt is sent to an LLM for a response:
All in all, by running this code, we’ve transformed vector search into a chatbot capable of answering questions based on your documentation!
In this tutorial, we explored how to implement vector search and retrieval-augmented generation (RAG) using Aiven for AlloyDB Omni and Gemini models.
If you’re interested in related topics, check out these articles:
Table of contents
ALLOY_DB_USER=
ALLOY_DB_PASSWORD=
ALLOY_DB_HOST=
ALLOY_DB_PORT=
GEMINI_API_KEY=
npm install @google/generative-ai dotenv pg pg-promiseimport pg from "pg";
import fs from 'fs';
import 'dotenv/config';
// Connecting to cloud-based PostgreSQL using credentials and ca.pem
// Configuration settings are taken from .env
const config = {
user: process.env.ALLOY_DB_USER,
password: process.env.ALLOY_DB_PASSWORD,
host: process.env.ALLOY_DB_HOST,
port: process.env.ALLOY_DB_PORT,
database: "defaultdb",
ssl: {
rejectUnauthorized: true,
ca: fs.readFileSync('./ca.pem').toString(),
},
};
export const alloyDBClient = new pg.Client(config);import {alloyDBClient} from "./config.js";
const enablePGVector = async () => {
await alloyDBClient.connect();
try {
const pgResponse = await alloyDBClient.query(`CREATE EXTENSION vector;`);
console.log(pgResponse.rows);
} catch (err) {
console.error(err);
} finally {
await alloyDBClient.end();
}
};
await enablePGVector();node enable-vector-extension.jsimport {alloyDBClient} from "./config.js";
const createTable = async () => {
await alloyDBClient.connect();
try {
const pgResponse = await alloyDBClient.query(`CREATE TABLE features (
description TEXT,
embedding vector(768)
);
`);
console.log(pgResponse.rows);
} catch (err) {
console.error(err);
} finally {
await alloyDBClient.end();
}
};
await createTable();import pgPromise from "pg-promise";
export const pgp = pgPromise({
capSQL: true // capitalize all generated SQL
});
export const pgpClient = pgp(config);const genAI = new GoogleGenerativeAI(process.env.GEMINI_API_KEY);
export const embeddingModel = genAI.getGenerativeModel({ model: "text-embedding-004"});import {pgp, pgpClient, embeddingModel} from "./config.js";
import features from './features.json' assert { type: "json" };
async function populate() {
const columns =
new pgp.helpers.ColumnSet(['description', 'embedding'],
{table: 'features'});
const rows = [];
for (const feature of features) {
const result = await embeddingModel.embedContent(feature);
rows.push({
description: feature,
embedding: result.embedding.values
})
}
// generating a multi-row insert query:
const query = pgp.helpers.insert(rows, columns);
// executing the query:
pgpClient.none(query).then();
}
await populate();node store-knowledge.jsSELECT * FROM features ORDER BY embedding <-> [search phrase vector] LIMIT 2;import {alloyDBClient, embeddingModel} from "./config.js";
const vectorSearch = async () => {
const testPhrase = "I need to clean my fridge";
const embeddingRequest = await embeddingModel.embedContent(testPhrase);
const testPhraseVector = embeddingRequest.embedding.values;
// connecting to Postgres
await alloyDBClient.connect();
try {
// using PGVector extension to find 2 closest vectors from movie_plots in comparison to testPhraseVector
const pgResponse = await alloyDBClient.query(
`SELECT * FROM features ORDER BY embedding <-> '${JSON.stringify(testPhraseVector)}' LIMIT 2;`);
console.log(pgResponse.rows);
} catch (err) {
console.error(err);
} finally {
await alloyDBClient.end()
}
}
await vectorSearch();import {alloyDBClient, embeddingModel, llmModel} from "./config.js";
const ragSearch = async () => {
const testPhrase = "Could you tell me what are the best features to clean my kitchen?";
// Step 1: Get embedding for the query
const embeddingRequest = await embeddingModel.embedContent(testPhrase);
const testPhraseVector = embeddingRequest.embedding.values;
// Step 2: Retrieve relevant context from PostgreSQL using PGVector
await alloyDBClient.connect();
let retrievedContext = "";
try {
const pgResponse = await alloyDBClient.query(
`SELECT * FROM features ORDER BY embedding <-> '${JSON.stringify(testPhraseVector)}' LIMIT 2;`);
retrievedContext = pgResponse.rows.map(row => row.description).join("\n");
} catch (err) {
console.error("Error during PGVector search:", err);
} finally {
await alloyDBClient.end();
}
if (!retrievedContext) {
console.log("No relevant context found.");
return;
}
// Step 3: Generate a response using the retrieved context
const prompt = `You're a helpful documentation bot.
Based on the following context, give the answer to the user question:\n\n
Context:\n${retrievedContext}\n\nQuestion: ${testPhrase}`;
console.log({prompt});
const result = await llmModel.generateContent(prompt);
console.log("Generated Response:", result.response.text());
};
await ragSearch();