How to send and receive application data from Apache Kafka®
Configure a connection to an Apache Kafka® cluster and use Apache Avro™ to send messages to it.
Configure a connection to an Apache Kafka® cluster and use Apache Avro™ to send messages to it.
Getting started with Apache Kafka can be straightforward: you download the binary and start the bootstrap server. However, standing up a production-ready Kafka cluster with security and high-availability is a different story. Have you added multiple Kafka brokers to ensure high availability while maintaining a low network
latency? How about the default replication factor? How are you ensuring the security and access control for your Kafka brokers?
Because administering production-ready Kafka clusters is difficult, we
at Aiven created a managed Kafka service with a free trial to avoid some of the hassle. This lets you focus on producing and consuming data with Kafka, rather than becoming a cluster administrator.
In this tutorial, we will learn how to create a highly available Apache
Kafka service, go over the common tasks of producing and consuming
messages, and finally use the popular Apache Avro™ specification to
communicate with your Kafka service. This tutorial will use the Python
programming language. Under the hood, the Python library will make use
of the Producer API and the
Consumer API.
To get started, you'll need:
A Kafka service - either local or managed
Kafka-python library
installed, you can install it with the following command:
Loading code...
confluent-Kafka
library installed that you'll use to produce messages in AVRO
format, you can install it with the following command:
Loading code...
fastavro library installed,
you can install it with the following command:
Loading code...
If you already have a Kafka service, jump to Create a topic section.
Otherwise, sign up for an Aiven
account and follow the tutorial to
create a Kafka service on Aiven.
To create an
Aiven for Apache Kafka service, you need to:
Log in to the Aiven web console.
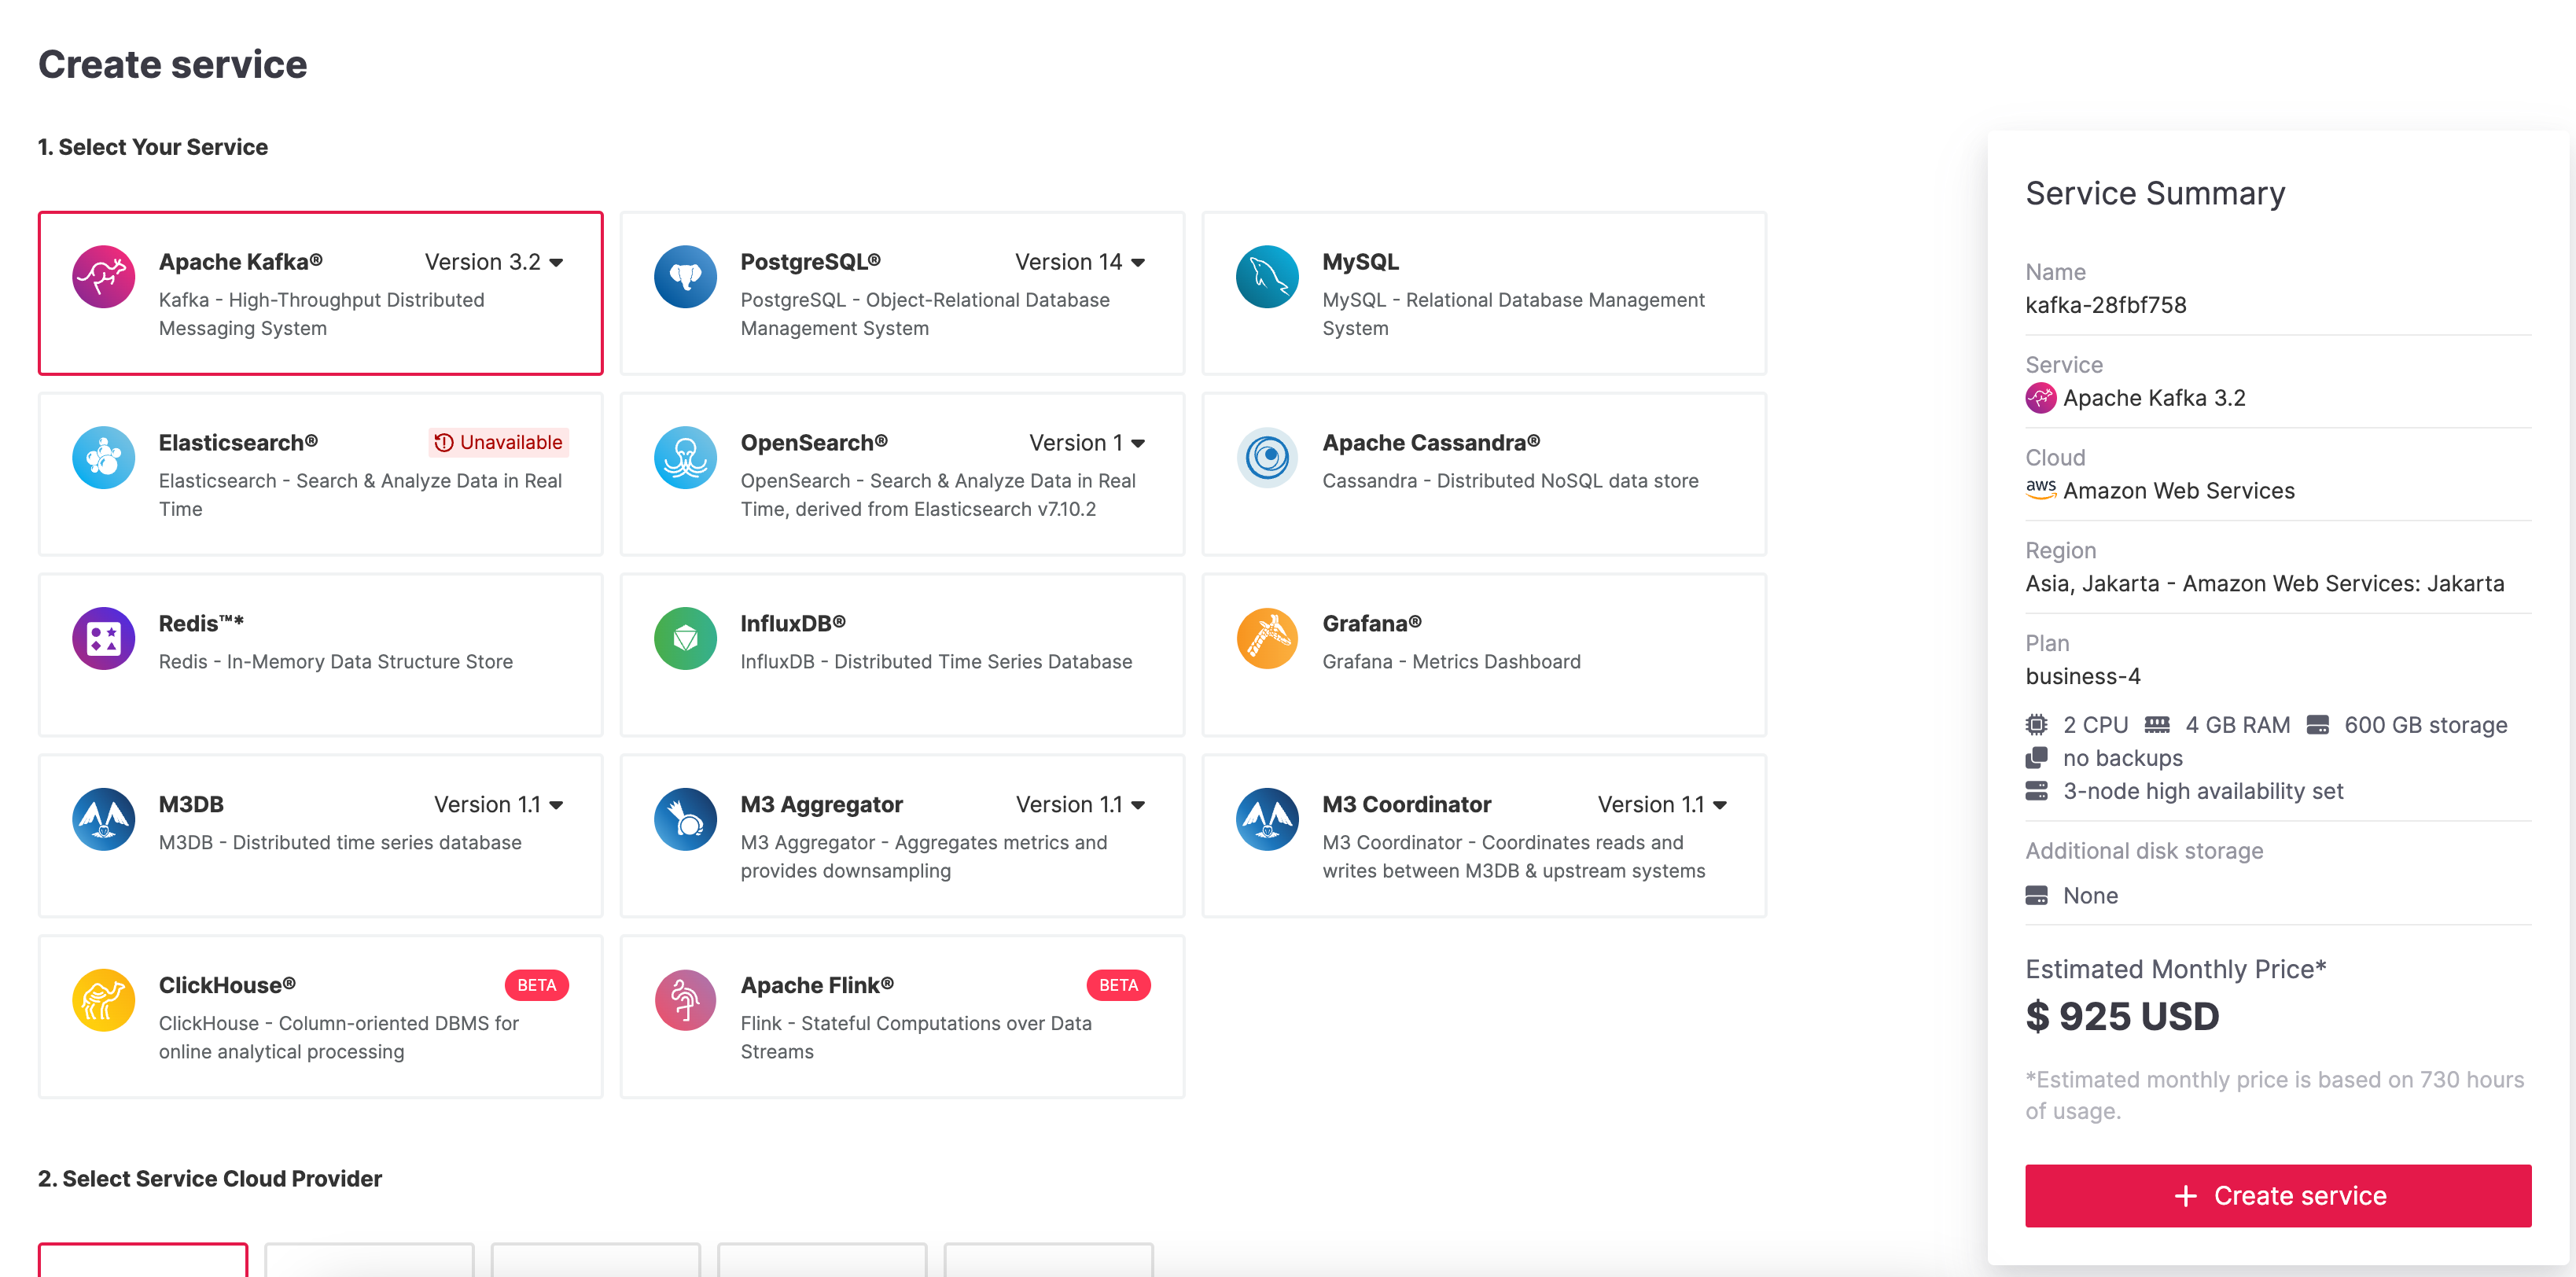
On the Services page, click Create a new service.
This opens a new page with the available service options.
Select Apache Kafka®.
Select the cloud provider and region that you want to run your
service on.
Select Startup-2 as service plan.
Enter demo-kafka as name for your service.
Click Create Service under the summary on the right side of the
console.
The blinking blue icon beside your service name will indicate that
service is being provisioned. Once the icon turns solid green, your
Apache Kafka service is up and running.
Let's start by copying the connection information for the newly created
Apache Kafka service in order to authenticate and authorize to the Kafka
broker.
Go to the Overview page of your Aiven for Apache Kafka service.
service.key file.service.cert file.ca.pem file.ca.pem fileclient.keystore.p12 and truststore client.truststore.jks by following our article on configuring Java SSL to access KafkaYou can also use the Aiven command line
tool to download the files.
See the documentation for avn service
user-creds-download
Details on the Aiven for Apache Kafka configuration can be found under
the reference section.
A topic in Kafka is a named stream of records that is stored within a
Kafka cluster. A record is a key-value pair associated with a timestamp
and other metadata. Records and topics can represent whatever you need
from a business perspective: in general, records represent events that
happen in a system, and a topic is a grouping of similar events. Let's
create a Kafka topic.
If you have a local Kafka instance running, the command to create the
topic might be something like this:
Loading code...
localhost:9092 if your local Kafka instance ip and port are different.
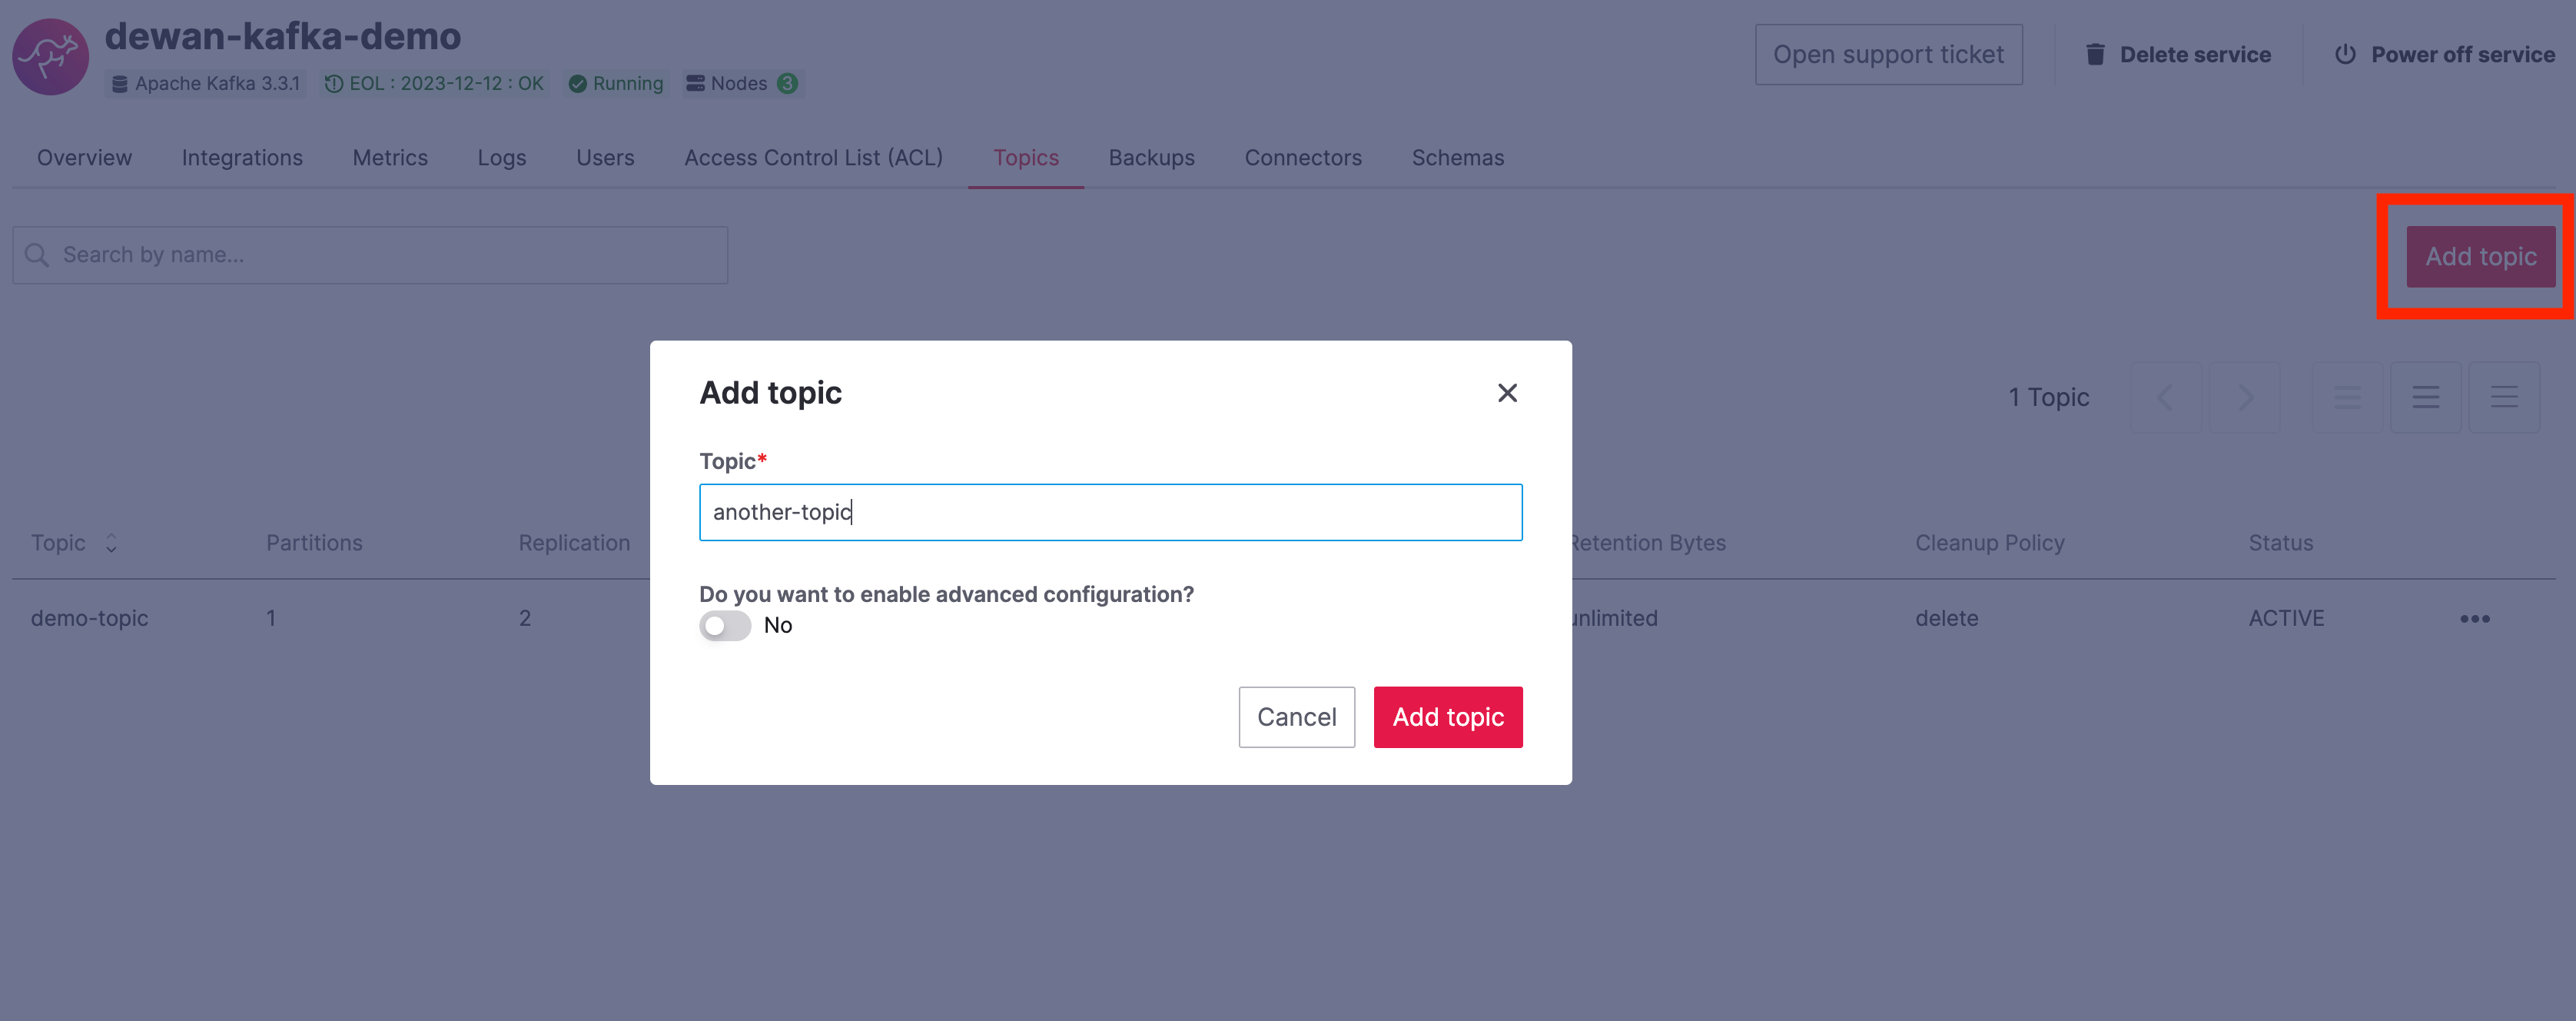
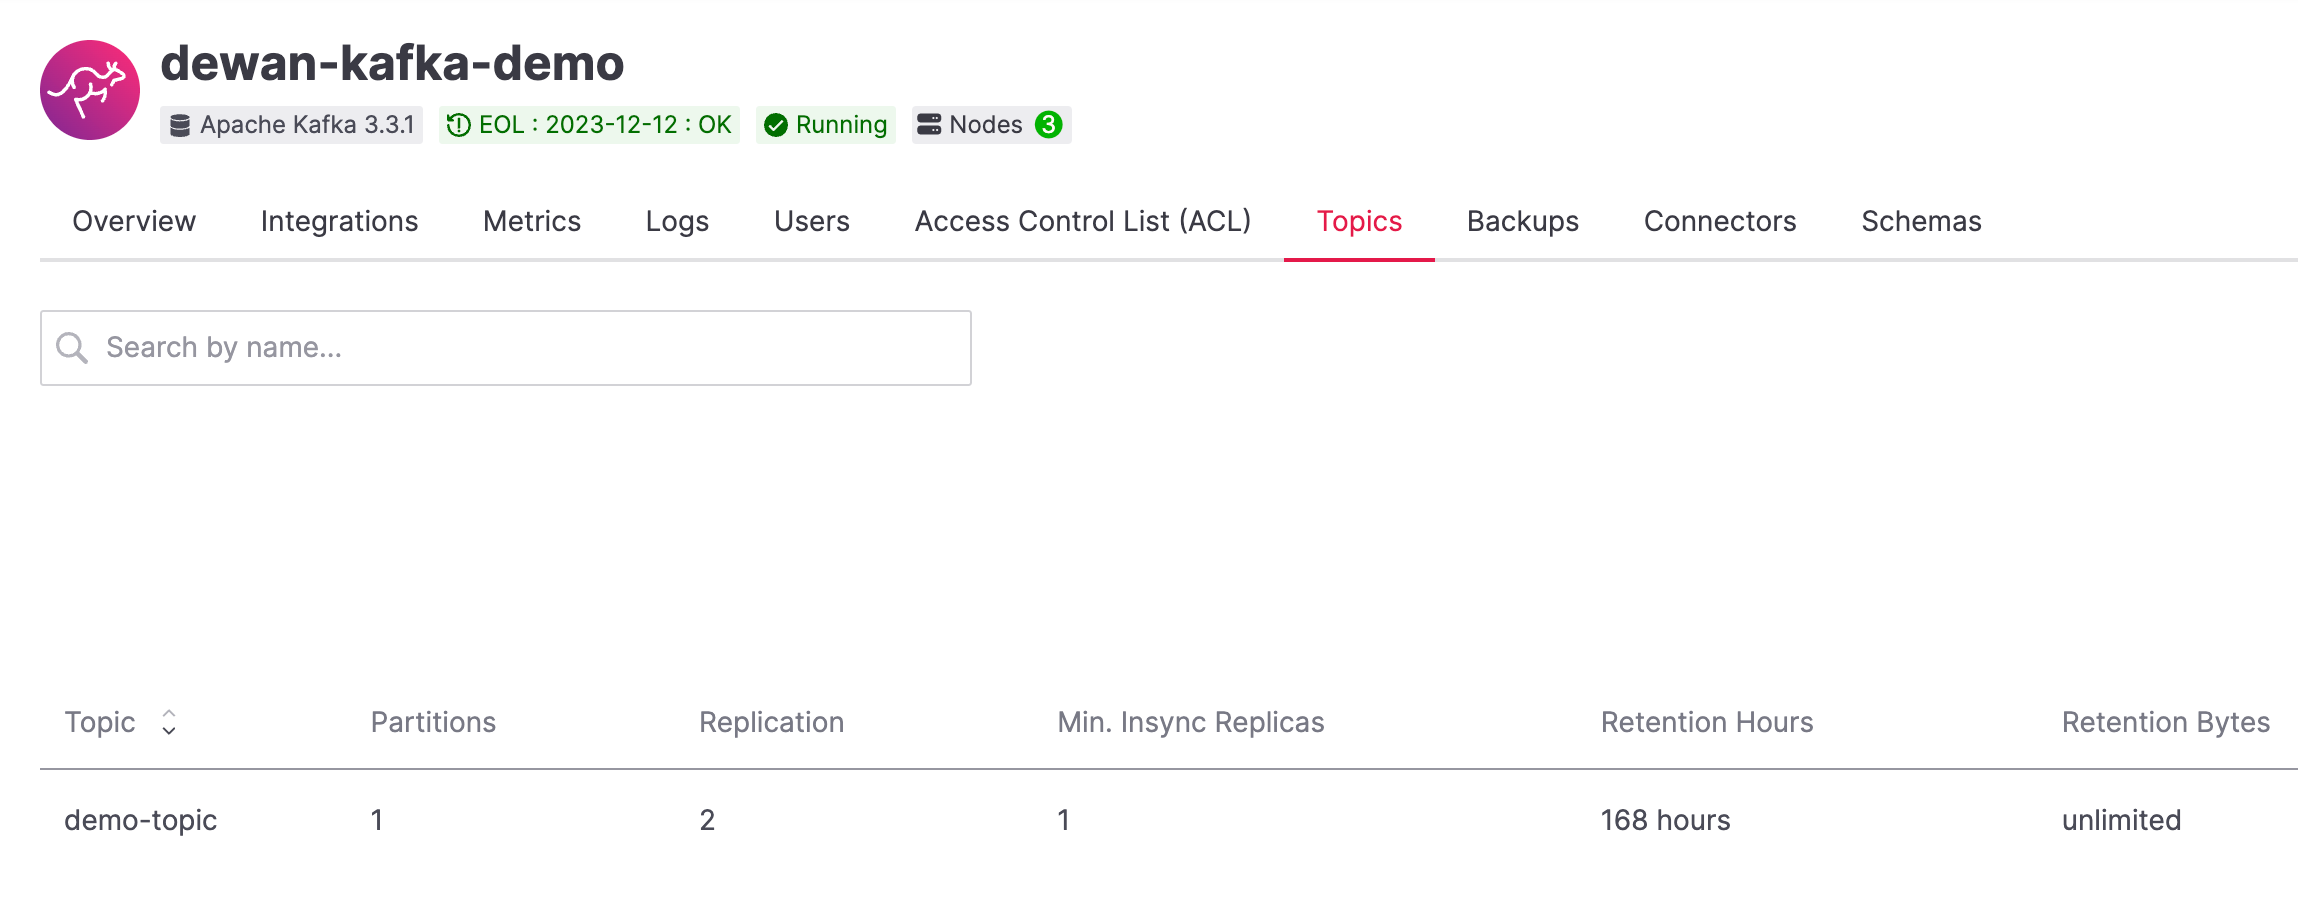
For an Aiven for Apache Kafka service, you can create the topic from the
Aiven console.
demo-topic.Once this topic is created, we can see that the default number of
partitions is 1.
A consumer group is the logical grouping of consumers. A consumer is
usually a client application that reads (consumes) events from Kafka. In
Kafka, the consumer(s) must belong to a consumer group. If you don't
define one, Kafka generates a random consumer group. For a Kafka cluster
with multiple nodes, consumers within the same consumer group can exist
on different nodes.
In the above diagram, there are four consumers that are subscribed to a
topic. Consumer 1 and Consumer 2 are part of Consumer Group 1 and
the other two consumers are part of Consumer Group 2. Now imagine a
producer publishing messages to this topic. Messages within each
partition are read in order but they are read in parallel across
partitions. Consumers read data in consumer groups and each consumer
within a group reads from exclusive partitions. From this diagram, both
consumer groups read all the data across all partitions from a topic.
Within Consumer Group 1, Consumer 1 and Consumer 2 read from
Partition 1 and Partition 2 and consumers within Consumer Group 2
also read from these same two partitions. A message will never be read
by more than one consumer in the group thanks to the consumer group
concept.
Let's start with a setup where we have a single producer writing to a
single topic with one partition. A consumer is reading messages from
this topic which is part of a consumer group.
In Kafka, a producer is any application which generates and sends
records to a Kafka cluster. The following Python code generates some
messages to the "demo-topic" topic using the
Kafka-python library:
With SSL authentication:
Loading code...
With SASL authentication:
Loading code...
With the producer program executed, now run the consumer program for
your chosen protocol.
With SSL authentication:
Loading code...
With SASL authentication:
Loading code...
Once messages are produced, they are written to the single partition
p0 of demo-topic. All the messages are consumed by the single
consumer co0 which is part of the single consumer group consumer group A.
Once you run one of the above consumer program python consumer.py,
you'll see the program running in the terminal but not doing anything!
That's because the consumer instance is listening for messages and
currently, there's no message to print out.
To see some action on this terminal, run the producer code in another
terminal. You will see the same record appear on the producer program
terminal.
Note that Kafka gives you a nicely packaged KafkaConsumer object which
continually checks for new messages at an interval of your choosing. You
didn't have to write custom application logic for this part.
What would happen if there were two partitions in this case, p0 and
p1? In this case, messages would be published to partition randomly.
The consumer co0 would take a round robin approach when consuming
messages from this topic.
Let's take a look at this setup where there are two consumers. co0
and co1 are registered to the same consumer group A.
In this setup, one consumer sits idle. This highlights an important
concept in Kafka - records are processed in parallel and the same
partition cannot be assigned to multiple consumers in the same consumer
group.
If the first consumer co0 crashes for some reason, the other consumer
co1 in the consumer group then begins consuming messages from the last
committed offset of the partition. This is what makes a cluster highly
available.
The Kafka brokers understand data as stream of bytes, so one needs to
pick a serializer and deserializer to convert the bytes into meaningful
messages. Any format will do as long as it's consistent. For this
tutorial, we're selecting Apache Avro, which is an open-source project
and one of the most popular serialization format. Avro is defined by a
schema and the schema is written in JSON. You can consider Avro as JSON
with a schema attached to it.
Both of these programs use SSL authentication. You can follow the
previous examples in this tutorial if you'd like to use SASL
authentication instead.
Here's an example of a Kafka consumer in Python using the
confluent-Kafka-python
library to produce Avro-encoded messages. In a terminal window, run the
following producer code. The program should execute and exit. You won't
see anything yet since we need the consumer program to run next.
Loading code...
With the producer program completed on one terminal, open up another
terminal and run the following consumer program.
Loading code...
Once you execute the consumer program, you should see the following
output on the second terminal while the consumer program stays running
until you hit ctrl+C:
Loading code...
Here's an overview of what each program does:
The producer program uses the confluent-kafka library to create an
AvroProducer instance and send Avro messages to a Kafka broker. The program will:
confluent_kafka,confluent_kafka.avro, ssl, and io.The consumer program uses the confluent-kafka library to create an
AvroConsumer instance and receive Avro messages from a Kafka broker.
The program will:
confluent_kafka,confluent_kafka.avro, and ssl.You might have noticed avro_serializer_key, avro_serializer_value,
avro_deserializer_key, and avro_deserializer_value in these
programs. Since Kafka brokers don't know about the records and only
deal in bytes, the programs need to serialize and deserialize data
before making sense of them. Overall, these two programs demonstrate how
to use Avro serialization and SSL protocols to send and receive messages
to/from a Kafka broker.
In this tutorial, we went over creating a highly available Apache Kafka
service and some key Kafka concepts like topic, partition, producer,
consumer, and consumer groups. We also learned the need for data
serialization in Kafka and use of Apache Avro™ to produce and consume
messages. Finally, we validated our understanding by creating multiple
Python programs to send and receive messages to/from Kafka.
| Variable | Description |
|---|---|
HOST | Host name for the connection |
USER_NAME or SASL_USERNAME | Name of the user for the connection |
SSL_PORT | Port number to use for SSL |
SASL_PORT | Port number to use for SASL |
SCHEMA_REGISTRY_HOST | Host address for the schema registry |
SCHEMA_REGISTRY_PORT | Port number for the schema registry |
SASL_PASSWORD | Password required to connect using SASL |
TRUSTSTORE_LOCATION | Location of your truststore (named by default as client.truststore.jks) |
TRUSTSTORE_PASSWORD | Password you used when creating a truststore |
KEYSTORE_LOCATION | Location of you keystore (named by default as client.keystore.p12) |
KEYSTORE_PASSWORD | Password you used when creating a keystore |
KEY_PASSWORD | Password for the key in the keystore, if you chose a different password than the one for keystore |
SERIALIZER | How to serialize data, you can find available options in the Apache Kafka documentation |
DESERIALIZER | How to de-serialize data, you can find available options in the Apache Kafka documentation |
For consumers you will also need:
| Variable | Description |
|---|---|
TOPIC_NAME | The name of the topic to read from |
START_FROM | The value to use for the auto_offset_reset parameter,which says which message to start consuming from. Allowed values are latest (consume from the end of the topic partition) and earliest (consume from the beginning of the topic partition) |
For more information on auto_offset_reset, see the Kafka documentation
on
auto.offset.reset
and Consumer
Position.
Check out more Aiven tutorials to learn about open-source data infrastructure.
Table of contents
pip install kafka-pythonpip install confluent-kafkapip3 install fastavrobin/kafka-topics.sh --create --topic demo-topic --bootstrap-server localhost:9092from kafka import KafkaProducer
import time
# Configuring the Kafka producer
producer = KafkaProducer(
bootstrap_servers=f"{HOST}:{SSL_PORT}", # From the connection information for the managed service
security_protocol="SSL",
ssl_cafile="ca.pem", # From the connection information for the managed service
ssl_certfile="service.cert", # From the connection information for the managed service
ssl_keyfile="service.key", # From the connection information for the managed service
)
# Generate 10 messages in total with 1 second interval
for i in range(10):
message = f"Hello from Python using SSL {i + 1}!"
producer.send("demo-topic", message.encode('utf-8'))
print(f"Message sent: {message}")
time.sleep(1)
producer.close()from kafka import KafkaProducer
import time
# Choose an appropriate SASL mechanism, for instance:
SASL_MECHANISM = 'SCRAM-SHA-256'
# Configuring the Kafka producer
producer = KafkaProducer(
bootstrap_servers=f"{HOST}:{SASL_PORT}", # From the connection information for the managed service
sasl_mechanism = SASL_MECHANISM,
sasl_plain_username = SASL_USERNAME, # From the connection information for the managed service
sasl_plain_password = SASL_PASSWORD, # From the connection information for the managed service
security_protocol="SASL_SSL",
ssl_cafile="ca.pem", # From the connection information for the managed service
)
# Generate 10 messages in total with 1 second interval
for i in range(10):
message = f"Hello from Python using SASL {i + 1}!"
producer.send("demo-topic", message.encode('utf-8'))
print(f"Message sent: {message}")
time.sleep(1)
producer.close()# Import the required library
from kafka import KafkaConsumer
# Configuring the Kafka consumer
consumer = KafkaConsumer(
"demo-topic",
auto_offset_reset="earliest",
bootstrap_servers=f"{HOST}:{SSL_PORT}", # From the connection information for the managed service
group_id="demo-consumer-group",
security_protocol="SSL",
ssl_cafile="ca.pem", # From the connection information for the managed service
ssl_certfile="service.cert", # From the connection information for the managed service
ssl_keyfile="service.key", # From the connection information for the managed service
)
# Continuously poll for new messages
for msg in consumer:
print("Message: ", msg.value)# Import the required library
from kafka import KafkaConsumer
# Choose an appropriate SASL mechanism, for instance:
SASL_MECHANISM = 'SCRAM-SHA-256'
# Configuring the Kafka consumer
consumer = KafkaConsumer(
"demo-topic",
auto_offset_reset="earliest",
bootstrap_servers = f'{HOST}:{SASL_PORT}', # From the connection information for managed service
group_id="demo-consumer-group",
sasl_mechanism = SASL_MECHANISM,
sasl_plain_username = SASL_USERNAME, # From the connection information for the managed service
sasl_plain_password = SASL_PASSWORD, # From the connection information for the managed service
security_protocol = "SASL_SSL",
ssl_cafile = "ca.pem" # From the connection information for the managed service
)
# Continuously poll for new messages
for msg in consumer:
print("Message: ", msg.value.decode("utf-8"))# Import required libraries
from confluent_kafka import Producer
from confluent_kafka.serialization import StringSerializer, SerializationContext, MessageField
from confluent_kafka.schema_registry import SchemaRegistryClient
from confluent_kafka.schema_registry.avro import AvroSerializer
# Configure the Kafka producer
conf = {
"bootstrap.servers": f"{HOST}:{SSL_PORT}",
"security.protocol": "SSL",
"ssl.ca.location": "ca.pem",
"ssl.certificate.location": "service.cert",
"ssl.key.location": "service.key",
"client.id": "0001",
"acks": 1,
"compression.type": "gzip",
}
# Configure the Avro schema registry
schema_registry_conf = {
"url": f"{SCHEMA_REGISTRY_URI}"
}
schema_registry_client = SchemaRegistryClient(schema_registry_conf)
# Define the Avro schema for the message
value_str = """
{
"namespace": "example.avro",
"type": "record",
"name": "User",
"fields": [
{"name": "name", "type": "string"},
{"name": "age", "type": ["int", "null"]}
]
}
"""
key_str = """
{
"namespace": "example.avro",
"type": "record",
"name": "Id",
"fields": [
{"name": "id", "type": "int"}
]
}
"""
# Define a class for the User object
class User(object):
def __init__(self, name, age):
self.name = name
self.age = age
# Define a class for the Key object
class Key(object):
def __init__(self, id):
self.id = id
# Converting user object to key for AvroSerializer function
def user_to_dict(user, ctx):
return dict(
name=user.name,
age=user.age,
)
# Converting key object to key for AvroSerializer function
def key_to_dict(key, ctx):
return dict(id=key.id)
# Create the Avro serializer
avro_serializer_value = AvroSerializer(
schema_registry_client, value_str, user_to_dict
)
avro_serializer_key = AvroSerializer(
schema_registry_client, key_str, key_to_dict
)
# Create the string serializer for Key
string_serializer = StringSerializer("utf_8")
# Create the Kafka producer
producer = Producer(conf)
# Define the message key and payload
key = Key(id=1)
payload = User(name="John", age=30)
# Send the message to the Kafka topic
topic = "demo-topic"
producer.produce(
topic=topic,
key=avro_serializer_key(
key, SerializationContext(topic, MessageField.KEY)
),
value=avro_serializer_value(
payload,
SerializationContext(topic, MessageField.VALUE),
),
)
# Wait for any outstanding messages to be delivered and delivery reports to be received
producer.flush()# Import required libraries
from confluent_kafka import DeserializingConsumer
from confluent_kafka.serialization import SerializationContext, MessageField, StringSerializer
from confluent_kafka.schema_registry import SchemaRegistryClient
from confluent_kafka.schema_registry.avro import AvroDeserializer
# Configure the Kafka consumer
conf = {
'bootstrap.servers': f"{HOST}:{SSL_PORT}",
'group.id': 'demo-consumer-group',
'auto.offset.reset': 'earliest',
'security.protocol': 'SSL',
'ssl.ca.location': 'ca.pem',
'ssl.key.location': 'service.key',
'ssl.certificate.location': 'service.cert'
}
# Configure the Avro schema registry
schema_registry_conf = {
"url": f"{SCHEMA_REGISTRY_URI}"
}
schema_registry_client = SchemaRegistryClient(schema_registry_conf)
# Define the Avro schema for the message
value_str = """
{
"namespace": "example.avro",
"type": "record",
"name": "User",
"fields": [
{"name": "name", "type": "string"},
{"name": "age", "type": ["int", "null"]}
]
}
"""
key_str = """
{
"namespace": "example.avro",
"type": "record",
"name": "Id",
"fields": [
{"name": "id", "type": "int"}
]
}
"""
# Define a class for the User object
class User(object):
def __init__(self, name, age):
self.name = name
self.age = age
# Define a class for the Key object
class Key(object):
def __init__(self, id):
self.id = id
# Converting dict to User object for AvroDeserializer function
def dict_to_user(obj, ctx):
return User(name=obj['name'],
age=obj['age']
)
# Converting dict to Key object for AvroDeserializer function
def dict_to_key(obj, ctx):
return Key(id=obj["id"])
# Create the Avro deserializer
avro_deserializer_value = AvroDeserializer(
schema_registry_client, value_str, dict_to_user
)
avro_deserializer_key = AvroDeserializer(
schema_registry_client, key_str, dict_to_key
)
# Create the Kafka consumer
consumer = DeserializingConsumer(
conf
)
# Subscribe to the Kafka topic
consumer.subscribe(['demo-topic'])
# Consume messages from the Kafka topic
while True:
try:
msg = consumer.poll(1.0)
if msg is None:
continue
if msg.error():
print("Consumer error: {}".format(msg.error()))
continue
user = avro_deserializer_value(
msg.value(), SerializationContext(msg.topic(), MessageField.VALUE)
)
key = avro_deserializer_key(
msg.key(), SerializationContext(msg.topic(), MessageField.KEY)
)
if user is not None and key is not None:
print(
"Key --> {}\n"
"User record --> name: {},"
" age: {}\n".format(key.id, user.name, user.age)
)
except KeyboardInterrupt:
break
# Commit the offset for the message
consumer.commit()Key --> 1
User record --> name: John, age: 30