Connect Aiven for Apache Kafka® with Quix
Connect your Aiven for Apache Kafka® service with Quix to consume the data and process it in real-time, and produce it back to Kafka via Quix Cloud.
Quix is a complete platform for developing, deploying, and monitoring stream processing pipelines. You use the Quix Streams Python library to develop modular stream processing applications, and deploy them to containers managed in Quix with a single click. You can develop and manage applications on the command line or manage them in Quix Cloud and visualize them as a end-to-end pipeline.
Prerequisites
To connect Aiven for Apache Kafka® and Quix:
- A running Aiven for Apache Kafka® service. See Getting started with Aiven for Apache Kafka for more information.
- A CA certificate file for your Kafka instance. See Use SASL authentication with Aiven for Apache Kafka®.
- An account with Quix. If you don't yet have an account, you can sign up for a free trial.
Connect Aiven for Apache Kafka® to Quix
To configure and connect Aiven for Apache Kafka® with Klaw:
-
Log in to the Quix Portal.
-
Open an existing Project or create a project. For more details, see the Create a test pipeline section below.
-
Create an environment.
-
If you're editing an existing project, open the project settings and click + New environment.

-
Follow the setup wizard until you get to the broker settings.
-
-
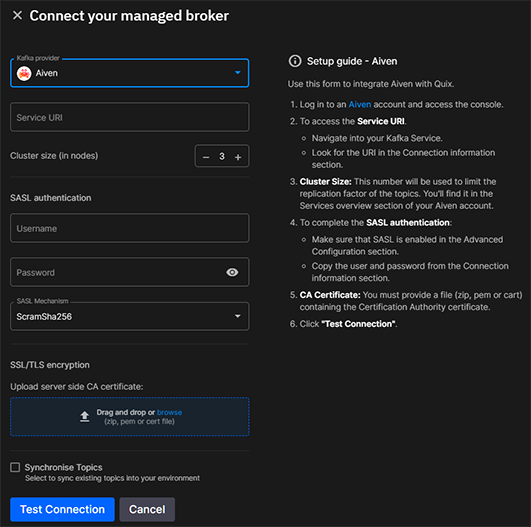
When you get to the broker settings, select Aiven as your broken provider.

-
Configure the required settings:

- Service URI: Enter the Service URI for your Apache Kafka service. Find the service URI in the Connection information page of your service in Aiven Console
- Cluster Size: This number is used to limit the replication factor of the topics. You'll find it in the Services overview section of your Aiven account
- User name: Make sure that SASL is enabled in the Aiven Advanced Configuration section and copy the user name into this field.
- Password: Likewise, copy the password from the Aiven Advanced Configuration section.
- SASL Mechanism: Use the same SASL mechanism as defined in the Aiven Advanced Configuration section.
- CA Certificate: Upload the CA file that you downloaded from the Aiven console.
Create a test pipeline
To help you get started, the Quix platform includes several pipeline templates that you can deploy in a few clicks.
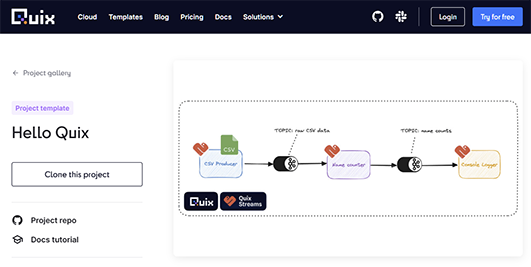
To test your Aiven for Apache Kafka® connection, you can use the Hello Quix template, which is a three-step pipeline:

- Click Clone this project.
- On the Import Project screen, click Quix advanced configuration to ensure you get the option to configure own broker settings.
- Follow the project creation wizard and configure your Aiven for Apache Kafka® connection details when prompted.
- Click Sync your pipeline.
Test the Setup
In the Quix portal, wait for the services to deploy and their status to become Running.

Ensure the _csv-data_ and _counted-names_ required topics appear in both Quix
and Aiven. In Aiven, topics that originate from Quix have the Quix workspace
and project name as a prefix, such as _quixdemo-helloquix-csv-data_.
Related pages